Musings about Food & the Politics of Food.

TartQueen's Kitchen


Thoughts on Hiatus and Returning to Writing 0

Posted on June 02, 2016 by Sahar

IMG_8046


Just in case you hadn’t noticed, I decided to take a hiatus from writing my blog.  The reasons, while not terrible, were many.  Travelling, house remodeling, working, cat care, recipe writing & testing, teaching, and the holidays all played a part. The most looming one for me was, of course, the most distressing; I felt stuck and uninspired. I’m not a natural writer. And as I began to lose confidence in my writing, the process became slower and more fraught every time I sat at the keyboard.  It’s all right to write about recipes and travel, but when one feels frustrated with the process, it’s time to step back for a while.

And that’s what I did.

I’m feeling better about things now and am hoping to look at this blog with a fresh perspective.  I’ll still bring you recipes and travel, but I also want to talk about ingredients, maybe discuss a cookbook I like (or don’t), a photographic study, or do the occasional stream-of-conscienceness rant.  I like to think if I can keep this fresh and exciting for me, it will be for all of you, too.


IMG_4136


IMG_7360

IMG_7340

IMG_7113

I’m still teaching at North Lamar Central Market Cooking School (the original CM!) as I have been for the last 18 years.  Funny how I still learn something about teaching every time I go in. (Shameless plug time – go to my “Classes” page and my upcoming classes are listed. If you’re in Austin, in the surrounding area, or even visiting, come by and see me.)

Another big change for me is my (almost) new part-time gig at Boggy Creek Farm. I started there as a farmhand volunteer a year ago and came on as a part-time cashier last October. I don’t know why I didn’t do it sooner.  That farm is simply a wonderful place to be to clear one’s head and to learn about where, how, and, yes, why locally grown foods are so important; not only for one’s health, but for the health of the ecosystem as well.  The farmstand is open Wednesday through Saturday, 8am – 1pm.

Added bonus – not only are Carol Ann & Larry two of the best people I know, asking them a question about the farm, farming, fermentation, seasonality, woodworking, chickens, and even history, is like getting a Master Class every time.  Carol Ann has also made me the official farmstand photographer. So, I get to do one of the things I love the most – take copious amounts of photographs. Honestly, around the farm, it’s easy to get lovely pictures.

IMG_7853

IMG_7484

IMG_7840

IMG_7752

IMG_9603

IMG_7484

IMG_7622

IMG_9503


So, I hope to bring you some new recipes along with other thoughts and wanderings starting again next week. Until then, enjoy a few more randomly selected photographs.

IMG_7550

IMG_8095

IMG_9492

DSCN2551

IMG_0633

IMG_0407

IMG_1125

IMG_1235

IMG_0592

DSCN2286

DSCN2337

DSCN1179

I’ll see y’all soon.


Arabic Style Savory Pies 6

Posted on September 30, 2012 by Sahar

Just about every cuisine in the world has it’s own version of savory pies.  The Latin World has empanadas; Austrailia has Meat Pies;  Great Britain has Pasties and Scotch Pies; India has Pakora.

And, in the Middle East, they have Fatayer (فطاير), Sfeeha (صفيحة), and Sambousek (سمبوسك).  They can be eaten as mezze or as part of a main meal (the way I like to do it).


A Primer:

Fatayer are baked triangle-shaped pies that are usually filled with cheese or spinach.

Sfeeha are open-faced pies usually with a meat topping, but other ingredients can be used as well.

Sambousek are essentially half-moon shaped pies that can either be baked or fried.  They usually have meat or cheese filling.

And they are all delicious.

**************

For my post, I’ve made the Fatayer and Sambousek.  I used spinach in the Fatayer and lamb in the Sambousek.  No frying, though.

And now, on to the recipes.

The Ingredients

The spices. (L – from top clockwise) Black Pepper, Allspice, Cinnamon, Salt;
(R) Sumac


The pies in these recipes use a yeast dough.  I generally don’t proof my yeast (although I probably should).  I just pay attention to the expiration date on the package and use my yeast quickly.  However, if you want to proof, here’s how you do it:

Fill a measuring cup with 1/4 cup of warm (95F – 105F) water.  Mix in 1/4 teaspoon of sugar, then 1 package of the yeast. (Yeast loves warm temperatures and food.  Hense the warm water and sugar. It’s basically a fermenting process.) Let the yeast dissolve in the water (you may have to do a little stirring to accomplish this).  Set the measuring cup aside in a warm place and let the yeast do its thing.  If it begins to bubble and rise, then it’s good.  If the yeast does nothing, then either your water wasn’t the correct temperature or your yeast was bad.

There is a spice I use for the spinach filling that you may not be familiar with: Sumac.  Sumac can generally be found growing wild throughout the Middle East.  It’s “berry” has a thin skin and flesh surrounding a very hard seed.  These “berries” are ground down to make a powder.  Sumac has a tart, slightly astringent, almost lemony flavor.  Look for sumac that is brick red to dark burgundy  in color and is an even grind.  You want it to have a bright scent.  If it smells like dirt, don’t buy it.  It’s old.

Don’t go and pick berries off a sumac plant if you see one.  It’s most likely “poison sumac”.  Just buy the dried ground in the store.

Sumac is used for Zaatar (a spice mix that also has thyme, sesame seeds, and salt), in kebabs as a seasoning, on vegetables, eggs, in meat dishes.  It’s a ubiquious spice in the Middle East.

Sumac.


Pastry Dough

6 c. all-purpose flour

1 package yeast

1 tbsp. salt

1 tsp. sugar

1/4 c. olive oil

2 c. warm water (95F – 105F), more if needed


I prefer to mix my pastry dough by hand.  However, if you like to use a mixer or a processor, by all means, do so.

1.  In a large bowl, mix together the flour, yeast, salt, and sugar.

Dry pastry ingredients

Add the olive oil and mix it in.

Adding the olive oil

Add the water.

Adding the water.


Now, mix throroughly.  You want to have a dough that is slightly sticky.  I’ve found that it’s all right if it isn’t perfectly smooth.  However, you want to work the dough as much as possible without having to add any additional water or flour if you can.

Trust me, it will come together.

(Apologies for the following photos. I didn’t stop to “pose” while Husband was taking them, so they’re a little blurry. But, I think you’ll get the point.)

Mixing the dough.

Mixing the dough. In the beginning there will be a lot of dry compared to wet. Keep working the dough.

The dough is coming together. I haven’t added any additional flour or water.

The dough has come together and the bowl is fairly clean. Which is what you want.

2.  Knead the dough for about 5 minutes. You can do this in the bowl or turn the dough out onto a flat surface. Or, if you’re using a mixer, use the dough hook.

3.  Pour a little additional olive oil to grease the bowl.  Place the dough back in the bowl and rub a little olive oil over the top.  Cover the bowl with plastic wrap and set it in a warm placce to rise.  About 2 hours.

4.  Meanwhile, make the fillings:

***************

Spinach Filling for Fatayer

1 1/2 lbs. spinach (I like to use baby spinach.  I don’t have to trim the stems or chop it)

1/4 c. sumac, or to taste

1 tbsp. salt or to taste

1/4 c. lemon juice, or to taste

1/4 c. olive oil, more if needed


1.  In a very large bowl, mix all the ingredients together.  Taste and adjust the seasonings.

The spinach filling mixture.

2.  Pour the spinach mixture into a large colander and place the colander over the large bowl.  The spinach will basically (chemically) cook as it sits and release moisture.  The colander allows the excess moisture to drain away.

Toss the spinach occasionally.  Because it’s essentially cooking, it will wilt.

The colander sitting in the bowl. This will allow any moisture to drain off as the spinach sits.

The excess moisture from the spinach mixture after about 2 hours.


And you may ask the questions: Well, why do this in advance then? Why not wait until just before making the pies before mixing the spinach?

Because, wilting the spinach and allowing it to drain will get rid of any tannins in the spinach and will make it easier to fill the pies bacause you don’t have to contend with leaves flying all over the place.


Meat Filling for Sambousek

2 tbsp. olive oil

2 lbs. ground lamb or beef (I like to use an 80/20 grind. I find it has more flavor)

1 sm. onion, minced

2 cl. garlic, minced

2 tsp. salt, or to taste

1 tsp. black pepper, or to taste

1 tsp. allspice, or to taste

1/2 tsp. cinnamon, or to taste


1.  Heat the oil in a large skillet over medium-high heat.  Add the onion and garlic and saute until the onion has softened, about 3 – 5 minutes.

2.  Add the meat and continue cooking until it is cooked through and there is no pink left.

3.  Add the spices and cook another 2 – 3 minutes.  Taste for seasoning.

Cooking the meat filling.

4.  Put the meat filling into a large strainer or colander and allow any fat to drain off.  Set aside and allow to cool.

The fat after the meat has been drained. Gross, but, there it is.

***********

5.  Prepare several large baking sheets (I usually do 4) for prepping and baking.  Line the baking sheets with heavy duty foil (saves on clean-up later) and then line the bottom with parchment paper.  Set the pans aside.

The prepared baking pans

6.  After 2 hours, the dough should be ready for forming.

The dough after the first rising.

Punch down the dough and knead it until it forms a smooth ball.

Punching down the dough to start releasing the excess air. Plus, it’s fun.

Folding the dough over on itself. I’m kneading and releasing the excess air.

The dough after kneading. Almost back down to its original size.


Now, take the dough and pinch off roughly golf ball -sized pieces and shape them into balls.

Pinching off the dough to form smaller balls for the pies.

Take each piece of dough and begin tucking under the edges to form a smooth ball of dough.  Well, as smooth as you can make it.

Forming a ball of dough.

Tucking under the ends.


Lay the balls of dough on one of the baking sheets as you finish them.  I generally keep them about 1″ apart.

Laying the dough on the tray.

Cover the try with plastic wrap and set aside to let the dough rise again.  About 30 minutes.

A finished tray of dough.

The dough 30 minutes later. This is the reason you keep them 1″ apart.

7.  Preheat your oven to 400F.  Have a rack in the center of the oven.

8.  Now, to form the pies.  Lightly flour a flat surface and a rolling pin. (Don’t over-flour.  It will make the dough harder to work with when you form the pies.) Take one of the balls of dough and place it on the board.  Roll out the dough into a roughly 4″ – 5″ circle.

Rolling out the dough.

Rolling out the dough.

Rolling out the dough.

Not exactly round. More like an amoeba shape. But, you get the point.

Fun tip:  I have also used my tortilla press to make the dough circles.  Just line your press with plastic wrap first.


9.  Fill the pies.  For the fatayer, place roughly 2 – 3 tablespoons of the spinach filling in the center of the dough (you’ll basically need to eyeball this measurement).

Placing the spinach on the dough.

The spinach on the dough. I like to spread it out a bit. Make it into, normally, a rough triangle shape.

Now, to form the pies:

Begin by taking the left side of the circle and folding it over at an angle towards the center, forming a partial peak at the top.

Folding over the dough to form the pies.

Take the right side and repeat the process.

Folding over the right side

Fold the bottom side over towards the center, forming the triangle.

The final side folded over.

Now, pinch the seams closed.

Pinching the seams closed.

The finished pie.

Lay your finished pies on a baking sheet.

Many finished pies.

Note:  As you get further down into the colander, you’ll want to squeeze some of the excess moisture out of the spinach.  While the spinach on top may not have as much moisture, gravity is doing its work and drawing the moisture down and, of course, the bottom will have more than the top.


To fill the Sambousek:  Roll the dough out as you would for the Fatayer.

Spoon roughly 2 tablespoons of the meat filling over 1 side of the dough.  Be sure to leave about 1/4″ of dough uncovered on that side for sealing.

Filling the Sambousek.

The meat filling for the Sambousek.

Fold the empty side over the top and cover the filling.

Folding over the dough.

Press and then pinch the seam closed.

Pressing the seam closed.

Pinching the seam closed.

The finished pie.

Lay the finished pie on the baking sheet and continue with the rest of the dough and filling.

Many finished pies.

10.  To bake the pies:  Bake the pies for 15 – 20 minutes or until golden brown.  I like to bake mine for 10 minutes, turn the baking sheet, and bake for an additional 10 minutes.

Now, especially with the Fatayer, some of the pies may come open during baking.  It happens to me all the time.  Don’t despair. Consider them a cook’s treat.  Also, even though you have do doubt worked diligently to remove as much moisture as possible from the spinach, some will remain.  Occasionally, the moisture will cause the spinach to break through the bottom of the Fatayer.

To remedy this,  either make larger balls of dough when you form them after the first rising (roughly somewhere between golf ball and baseball-sized; the dough for the pies will be thicker, but you will have fewer pies); or, simply roll the dough thicker to make smaller pies.

Otherwise, don’t worry about it. It’ll still taste great.

Hey, it’s homemade.

The finished Fatayer.

The finished Sambousek.


The pies can be eaten either warm or at room temperature.


Enjoy! Sahtein!


Points West 2

Posted on September 28, 2012 by Sahar

Finally, after much editing of photos (down to 408 from 500+), trying to remember details in the correct order, and much proofreading, I have finally finished this post.

Enjoy.

*****************

As I wrote in my previous post, my husband Steve & I decided a couple of years ago that we wouldn’t buy each other birthday gifts anymore.  We would take little trips around Texas instead.  Much more fun and the memories would last longer.

I mean, why not?  Texas is a big state with a big personality.  There’s always something new to see.  And eat.  Even in your own backyard.

We started out on Wednesday, August 29, with a very packed car and a little distressed we were leaving about 2 hours later than we originally planned.  To be honest, it’s kind of par for the course for us.

The sun breaking through the clouds. Outside Ozona.

I-10W on the way to Roosevelt


Our first stop was a cafe in Roosevelt recommended by our friend Joe Nick Patoski.  It was at the Simon Brothers Grocery & Mercantile.  We arrived about 2 pm and were wondering if we’d found the right place.  As Steve & I wandered around the store, we finally found the cafe.  Behind a door with a tiny hand-written sign, “CAFE”.  (I’m sorry now I didn’t get  picture of that door.)

Simon Bros. Cafe. We loved the fact that the seats were old office chairs.


We tried the cheeseburgers.  On Texas Toast. We weren’t disappointed.  And the fries?  Hand-cut.  Yummy.

Yummy, yummy Simon Brothers lunch.

The little mercantile was an attraction in and of itself. I have no idea how old the groceries were and when the last time the place was cleaned.  And, I loved the fact that the post office is in the store, too.

The mercantile that time forgot.


Roosevelt Post Office in Simon Bros.


After lunch and a short walk about, we hit the road again.  Then, 3 hours later, we were finally at our destination.

Just outside Marfa.

The first hotel we stayed in was El Cosmico.  As Austinites know, it was opened by Liz Lambert in 2006, and it is one of the coolest places Steve & I have ever stayed.

It’s on the outskirts of Marfa on South Highland Ave. A wonderfully rustic, organic space. I saw 7 restored AirStream Trailers, 2 teepees, and 5 safari tents.  Plus, there are several rock circles as spaces for people to pitch their own tents.

We loved it.

El Cosmico’s lobby. A lovely space, by the way. And the only place you can get WiFi. If you need it.

No cars are allowed on the grounds. This is how you transport your luggage.

Our trailer. A 1949 Airstream. It was the only one with AC. Steve made sure we got it.

View out the front. The interior is lovely.

A view into the kitchen and bedroom. The kitchen was suprisingly well stocked and the bed was really, really comfortable.

A nod to rusticity. Our outdoor shower. At least the water was really hot. Actually, it was very refreshing in the mornings.

The El Cosmico truck with a rainbow in the distance.

Once we settled in, it was time to make a quick grocery run to pick up food for breakfast. We had heard of a small grocery, The Get Go, that was supposed to be the best gourmet grocer in West Texas.  It didn’t disappoint.

The Get Go didn’t disappoint. Especially in the beer, produce, and cheese departments.

By this point, we were ready to go and get some dinner and go to see Paula Nelson at Padres Bar. It used to be a funeral home in a former life, apparently.

Marfa Sunset.

After our first choice of restaurant was closed, we headed to the outskirts of town and found Mando’s. A hole-in-the-wall Tex-Mex place (well, more Mex than Tex).  Overall, the meal was very good.  The beans had lard, the beer was cold, and my flautas were delicious.  However, the salsa was quite bland. The only disappointment.

First meal in Marfa. Chicken Flautas. Mando’s. They were delicious.

After dinner, we lurched off to Padres to see to Paula Nelson (yes, her daddy is Willie).  She was just lovely and had a great band backing her up.  It was a great way to end a very long day.

Paula Nelson at Padres.


Day 2.  Steve woke up at 6am and told me he wanted breakfast.  I honestly thought he was joking.  Nope.  He was wide awake and wanted breakfast.

OK. Fine.

While I conjured myself out of bed (and it was a chilly morning, so it was very difficult), he went outside and started taking a few photos:

Me getting ready to make breakfast while Steve is outside taking photos.

Marfa sunrise #1

Marfa Sunrise #2


Soon, breakfast was ready.  Lox & Brie Omelets with fresh tomatoes. They were really, really good.

Breakfast!

So, after breakfast and a shower, I promptly went back to sleep.  I’m not sure what Steve did.

Once we were both fully ready to get moving, we took a tour of the grounds of El Cosmico.

El Cosmico’s Bottle Tree

Long view of El Cosmico’s Trailers.

El Cosmico’s Teepees.

El Cosmico’s Safari Tents.

El Cosmico’s Hammock Village.

Now, off to see a bit of modern art. Prada Marfa. There’s really no point to it except as perphaps a commentary on consumerism.  Admittedly, it’s not really my thing.  But, if you’re in the area, it’s a must-see.

First, however, one must pass through Valentine.  A town with a population of 217 and the only incorporated town in Jeff Davis County. It’s best known for Prada Marfa, where the post office will do a special postmark on Valentine’s Day, and where “Cahill, US Marshall” was set.

Valentine, Texas. On our way to see Prada Marfa.

Prada Marfa.

The plaque explaining Prada Marfa.

Not long after it was completed in 2005, Prada Marfa was broken into and its contents stolen. To thwart any future attempts, all of the shoes on display are left shoes only and all the bags have had their bottoms removed.  Plus, the door is sealed (so no going inside for a closer look) and security cameras were installed.

Some people just don’t appreciate art.

Some of Prada Marfa’s contents.

The literal emptiness of Prada Marfa and its surroundings.


So, after closely observing Prada Marfa, we headed back to Marfa for lunch.

I saw this sign on the way back and made Steve turn around so I could get some pictures. I loved it.

Quite simply, the coolest old relic roadside sign I’ve ever seen. On the way back to Marfa.


So, now for lunch.  Steve & I decided to go to a place we’d been before, The Food Shark.  Popular with locals and tourists alike, it has some of the best felafel outside of the Middle East I’ve ever eaten.  My hummous is better, though.

Yeah. I said it.

They have a standard menu of Middle Eastern specialties like hummous, felafel, fatoush, and lots of fresh salads.  Their specials go fast. In fact, the day we were there, they ran out of the special, Shrimp with Soba Noodles, right before I got to the window.

If you get there during the peak lunch hour, be prepared for a wait.  So, patience is required.

Food Shark. The only food trailer in Marfa.

Steve’s lunch. The combo plate.

My lunch. Felafel.

A can of Harissa. A very popular condiment in North Africa, especially Tunisia. It’s used pretty freely at Food Shark.


After lunch, Steve & I went exploring around Marfa.  We’d been there before, so there wasn’t much new for us to see.  But, hey, we needed to work off lunch.

The predominant industry in Marfa, next to tourism. The Judd & Chinati Foundations.


Steve had been interested in going on a tour around the Chinati Foundation.  I was not.  Minimalist art simply isn’t my thing.  Honestly, I find it boring.  I told Steve he could go if he wanted, but he decided against it.

Well, maybe next time.

For those of you who don’t know who Donald Judd is or what the Chinati Foundation is all about, here’s a little background:

****************

Donald Judd was a sculptor in New York who bagan as a painter early in his career.  By the early 1960’s he came interested in how objects (namely, boxes and stacks) interplayed with the space around them.  In 1971, he came to Marfa and rented a house to get away from the art scene he had come to hate in NYC and to use the starkness of the desert landscape to create.

In 1979, with help from the Dia Art Foundation, Judd purchased a 340 acre  tract of desert land near Marfa  which included the abandoned buildings of the former U.S. Army Fort D. A. Russell. The Chinati Foundation opened on the site in 1986 as a non-profit art foundation, dedicated to Judd and his contemporaries. The permanent collection consists of large-scale works by Judd and other artisits. Judd’s work in Marfa includes 15 outdoor works in concrete and 100 aluminum pieces housed in two renovated artillery sheds.

Originally conceived in 1977, and created in 1996, the Judd Foundation was formed in order to preserve the work and installations of Judd in Marfa, Texas and at 101 Spring Street in New York.

Donald Judd passed away in 1994 of Non-Hodgkin’s Lymphoma in NYC.  (Some information from www.wikipedia.org)

Outside the Chinati Foundation in Marfa

Outside the Chinati Foundation. Marfa.

 **************
Marfa itself is the county seat of Presidio County, Texas.  The town’s permanent popluation, according to the 2010 census, is 1,981. It’s nestled between the Davis Mountains and Big Bend National Park.  it was founded in the 1880’s as a railroad stop and grew expodentially through the 1920’s.  During WWII, the Marfa Army Airfield served as a training ground for pilots.  It was closed in 1945.
Marfa is probably best known not only as the home of the Judd & Chinati Foundations, but also the Marfa Lights (mysterious lights in the Mitchell Flats ouside of town. Some believe they’re UFOs. Others, atmospheric conditions cause them.)  During the filming of the movie “Giant” the cast stayed at the largest hotel in town, the El Paisano

The front facade of the Hotel El Paisano.

The lobby of the Hotel El Paisano

The hotel has a room dedicated “Giant”.  They’re very proud of their connection with that movie.

Some “Giant” memoribilia.

“Giant” on a continual loop.

The town is completely reliant on the tourism that the park, Judd & Chinati, the lights, and “Giant” fans bring.  They’ve also started a music festival that happens in late September.  It’s also home to many (overpriced) art galleries.  And a lovely little bookstore with, of course, an art gallery attached. Plus, it has one of the best public radio stations anywhere, KRTS.

Marfa Fire Station

Palace Theater, Marfa.

Presidio County Courthouse, Marfa


Dinner that night was at Cochineal (named after the little insect used to make natural red dye).  A lovely little restaurant opened in 2008 by Tom Rapp and Toshi Sakihara. It’s menu changes almost daily to keep up with what’s freshest and the whims of the chefs.  We picked a good day to go.

Once you were inside, you could be anywhere. The dining room was a very simple space. Small, but not overcrowded.  It was still a little too warm for us to sit outside, but the patio was proving popular.  It was full when we arrived.

Reservations are recommended, by the way.

Cochineal’s dining room.

So, we began with cocktails.

Cochineal’s Cocktail Menu. Just the beginning of a wonderful meal.

Moscow Mule. The classic cocktails are always the best.

Unfortunately, I didn’t get a photo of Steve’s cocktail.  I believe he had the El Diablo. He said it was quite good.

Cochineal’s Dinner menu for August 29th, 2012.

Appetizer Time.  Cream Cheese Dip with Crab and Horseradish. Hot, slightly gooey, smooth with just enough texture  from the crab and heat from the horseradish. I’ve got to figure out how to make this.

Our appetizer. It was really, really good

Me. I had the Rack of Lamb with Truffled Potatoes and Garlic Broccolini.  The lamb was cooked perfectly medium-rare with just enough seasoning. (I find that to be a real issue with many restaturants who serve rack of lamb. Simple is best. It doesn’t need a crust.)  The potatoes were smooth without being starchy and the truffle wasn’t overpowering.  The Broccolini wasn’t reated as an afterthought, like so many vegetables are.

Sahar’s Dinner.

Steve’s dinner was Barramundi en Croute with Vegetables and Pico.  I had a little of his fish.  It was perfectly cooked.  I’ve never had Barramundi before, so the fact that it wasn’t too strong a flavor was a surprise.  Steve said that the pico and vegetables were good, too.  He must have liked it.  He ate it all.

Steve’s Dinner.

We figured as long as we were there, we’d just go for it and get dessert, too.  Yum-my.

I had a wonderful date pudding reminicent of sticky toffee pudding.  It had a caramel-bourbon sauce that had just the right balance of sweet and slightly bitter.  And the bourbon flavor wasn’t too strong.

Sahar’s dessert. Lovely. Just lovely.

Steve opted for Lemon-Lime-Basil Shortbread Cookies.  I didn’t get to try any.  He ate them too fast.

Steve’s dessert. He liked it.

After the bacchanalia of dinner, we decided to take a short walk around Marfa.  We were struck by a creche of Mary.

St. Mary’s Church. Marfa.


Back to the car. To our trailer. And to bed.

Day 3.  We checked out of El Cosmico and headed to where we would be staying for the next 3 nights, The Gage Hotel in Marathon.  But, first, we had to pass through Alpine.

Alpine is located in a wide valley in the foothills of the Davis Mountains in northwest Brewster County. The town began in the spring of 1882, when a few railroad workers and their families pitched their tents along a small spring-fed creek at the foot of what is now known as “A” Mountain.

Alpine grew very slowly until 1921. Then came the opening of Sul Ross State Normal College (now Sul Ross State University) and the construction of the first paved roads into the area. The college, along with ranching and the transcontinental railroad, made Alpine the center of activities in the Big Bend area of Texas. In the early 1940s, with the establishment of Big Bend National Park, Alpine came to be looked upon as the entrance to the park. Since the early 1960s the rapid influx of affluent retired people into the area has been an important factor in the town’s continued growth.

Alpine is the largest town in and the county seat of Brewster County with a 2010 population of 5,905. (Information from tshaonline.org)

Steve and I decided to get out and have a walk around town.  We stayed there on our last trip in 2010, but we didn’t really explore Alpine.  This time, we decided to rectify the situation.

There was a record store he wanted to see; but, it was closed.  Labor Day weekend.  In fact, we found quite a few businesses closed for the holiday.  No matter, we still had a lovely time.  Even bought some original art.

I think if I was to move anywhere else in Texas, it would be Alpine. Just enough town with open space nearby.

Granada Theater marquis. Alpine.

Our Lady of Peace Church. Alpine. I’m not a religious person, but I enjoy religious architecture.

Husband Steve with Tres Amigos. Alpine.

Back in the car to our next destination. Marathon. Or, as the locals say, Marath’n.

Road into Marathon.

Marathon is the second-largest town in Brewster County. It’s out on TX90 with a population of 433 (2010 census). The town was founded when the Galveston, Harrisburg and San Antonio Railway built across what was then part of Presidio County. A crew building east from El Paso reached the townsite in March 1882. (Some information from tshaonline.org)

The main attractions of the town are the Gage Hotel and the fact that it’s only about 45 minutes away from Big Bend National Park.  It’s another town that is completely dependent on the tourist industry.

The Gage Hotel. Marathon.


I would term the Gage as upscale rustic.  The hotel itself was commissioned in 1927 by Alfred Gage, a businessman and rancher.  It was intended as a hotel and main administrative building for his 500, 000 acre ranch.  In 1978, J.P. & Mary Jon Bryan bought the Gage and returned it back to it’s original Trans-Pecos glory (from www.gagehotel.com)

It was very different from where we stayed for the previous 2 nights.  And, for shmoes like us, quite elegant.  Plus, it had an indoor shower.

Our room at The Gage. Upscale Rustic.

Courtyard at the Gage.

Skull art that Steve found outside the White Buffalo Bar. Gage.


We took a very short walk for lunch after we checked in.  Pizza at Guzzi’s. Decent, if utilitarian, pizza. I wasn’t expecting that.

Boneless hot wings (which as we all know are boneless, skinless breast). They were average. But we were hungry.

Sahar’s lunch. 6-inch pepperoni pizza.

Steve’s lunch. 8-inch Royale Pizza.

So, off for a quick nap before our next destination.  Big Bend National Park.

Big Bend National Park was opened on July 1, 1944.  It is The park covers 801,163 acres (1,252 sq mi)and is larger than the state of Rhode Island.  It’s the least visited of all the national parks with only about 300,000 visitors a year.  The park was named after the large bend where Texas and Mexico meet along the Rio Grande.  The park is in the Chihuahuan Desert and is surrounded by the Chisos Mountains.

It’s simply an amazing place.

I wanted to head to the Chisos Basin and the Window, the most popular spot in the park, to see the sunset.  A little corny, sure; but so worth the journey.

Big Bend is about 40 miles from Marathon.  The main ranger station is at Panther Junction about another 30 miles in.  It seems like forever to get there because there is a 45mph in the park. And, yes, they do enforce it.

The road from Marathon to Big Bend.

We made it to the Chisos Basin, finally.

While waiting for the sunset at The Window, we decided to take a hike down the Basin Trail.

Casa Grande at the Chisos Basin.

Peaks in the Chisos Basin.

Bottlebrush flowers. They smelled amazing. The whole valley was filled with them.

Early evening in the Chisos Valley

We hiked the trail about half of its 1.6 miles.  It started to get dark and we turned around.

Off to see the sunset.

Sunset at the Window.

Sunset at The Window.


After a rather encyclopedic photographic study of the sunset, we decided we were hungry and headed out the south way from the park.

After about another hour’s drive through the park and another 30 minutes outside it, we finally made it to Terlingua.  We ended up at High Sierra Grill (at the El Dorado Hotel) for a rather late dinner.

The night we were there (Friday) was surprisingly slow.  There were fewer than 10 other people when we arrived.  And most of them were drinking at the bar.

There was musical entertainment that night.  Steve felt bad the musician was only playing to so few people, so he bought 3 of his cd’s

The musical entertainment at High Sierra Grill.

One of the more interesting uses of a vending machine.

Steve had a cheeseburger. I had chicken fried steak. Not the best I’ve ever eaten, but it was most definitely above average. Certainly better than Threadgill’s.

Yeah. I said it.

My dinner. Filling. And very starchy. Note the absence of any vegetable other than the potato. Covered with cheese.


After another 90-minute drive, we were finally back in Marathon and to bed. Very late.

Day 4.

Saturday. We had made plans to get to the park early. That didn’t happen.

We started off the day by, what else, foraging for breakfast.  One of the shop owners near the hotel told us about this one place, the Burnt Biscuit Bakery.  She said they had great fried pies.  Well, that sold us.

You can’t go wrong with a good fried pie.

But, we figured we’d better go with some savory protein first.

Our breakfasts. Burnt Biscuit Bakery.

I had a sausage & cheese croissant. I’m still trying to decide if the croissant was homemade or a pre-packaged one. I’m leaning towards the latter. Steve’s biscuit was definitely made in-house, however.

The proprietress was quite friendly & chatty. I sensed that tourists had been thin on the ground lately.  She let it be known that she and her husband (the baker) were looking to sell so they could move to the Panhandle to be closer to their kids and grandkids.

I almost bit. But,  changed my mind when I decided that Steve would most likely not go for the idea.

As a reward to ourselves, we bought a couple of fried pies.  Steve had peach. I had cherry.

The shopkeeper was right.  They were delicious.

A very fresh cherry fried pie. A Texas delicacy.

Burnt Biscuit Bakery. Marathon, TX


Back in the car and back to the park.

We spent about 4 hours driving through slowly and stopping frequently to take in the sights, the fresh air, and to take lots of photos.

(I generally don’t buy souveniers. I take photographs. They last longer and its a whole lot cheaper.)

The Chihuahuan Desert & Chisos Mountains. Big Bend Nat’l Park.

Ocotillo Cactus and Creosote Bush. Big Bend Nat’l Park.

It’s really hard to take a bad photo here.

Purple Prickly Pear.

One of the best things about Big Bend. It’s not completely overrun with tourists. You feel like you can breathe.

I dare you not to look at this and not have your mind cleared out.

Chenizo. One of the few flowers still blooming in the park.

Ocotillo Cactus in the Chihuahuan Desert. Big Bend. I really fell in love with this. I’m going to try to find some here in Austin to plant in my yard.


We drove back to Terlingua to have a light dinner (well, light for West Texas) at the Starlight Theater.

A little background on Terlingua:

The name Terlingua has been applied to three different settlements in southwestern Brewster Country. The original site was a Mexican village on Terlingua Creek three miles above the confluence with the Rio Grande. With the discovery of quicksilver in that area in the mid-1880s, the Marfa and Mariposa mining camp became known as Terlingua; the original site was then referred to as Terlingua Abaja, or lower Terlingua. In 1902, in addition to the mine complex, Terlingua consisted of several temporary structures occupied by some 200 to 300 laborers, mostly Mexican. Three years later the population had increased to 1,000. Quicksilver production peaked during World WarI. By 1922 40 percent of the quicksilver mined in the United States came from Terlingua, but production began to decline steadily during the 1930s. On October 1, 1942, the Chisos Mining Company filed for bankruptcy. A successor firm ceased operations at the end of World War II when most of the population dispersed. Terlingua became a ghost town. During the late 1960s and early 1970s tourism brought new life to the village. Terlingua became famous for its annual chili cook-off and in 1967 was deemed the “Chili Capitol of the World” by the Chili Appreciation Society. In 2000, the permanent popuation of Terlingua was 277. (information from tshaonline.org)

Steve & I visited Terlingua Ghost Town on a previous trip, and we tromped around what was left of the homes and cemetary there.

Terlingua Ghost Town.

Terlingua Ghost Town

Terlingua Ghost Town

The homes in Terlingua Ghost Town where were all the workers at the 4 mines in Terlingua, mostly Mexicans. The homes were essentially mud brick with some wooden support.  Most of the roofs are now gone, but I did see some tin corregated ones. Whether they’re the original or put there by squatters, I don’t know.

The cemetary is fascinating, if not a little depressing.  Most of the graves were not only of the Mexican workers, but their families as well.  And they were all young.  I think I only saw one grave of someone over 50.  Hardscrabble living and mercury poisoning no doubt contributed to the sort life span of these folks.

Cemetary at Terlingua Ghost Town

Cemetary at Terlingua Ghost Town

We arrived in Terlingua a little early.  Since the Starlight didn’t open for dinner until 5, we had a cold beer on the porch of the Terlingua General Store.  My favorite thing: signs all over the place saying “No dogs on the porch”. There were dogs all over the porch.

Finally, the Starlight opened. We were hungry and in a hurry.  We had tickets to go to a Star Party at the McDonald Observatory. 90 minutes away.

So, yeah. We were cutting it close.


Starlight Theater, Terlingua

The late, great Clay Henry. The Beer Drinking Goat and one-time mayor of Terlingua.

We just ordered appetizers for dinner.  It was a good thing we did.  They were huge.

Steve had  Wild Boar & Venison Sausage with a Barbecue Dipping Sauce.  My dinner was Chicken-Fried Antelope with a Coors Beer Gravy.  I liked his sausage better than my antelope.  I think it’s a pretty safe bet it was farm-raised.  I was expecting a gamier, more venison-like flavor.  It just tasted like beef to me.

Chips, salsa, and guacamole. The guacamole was good. The salsa was marginal. Starlight Theater. Terlingua.

Steve’s Dinner. Venison & Wild Boar Sausage. Starlight Theater.

Sahar’s dinner: Chicken Fried Antelope

We then rushed off to the McDonald Observatory, just outside of Fort Davis.  If you haven’t been there, go.  It’s an amazing place.  We went (for the second time) to a Star Party.  For those of you who don’t know, a Star Party begins at around sunset.  One of the observatoy’s employees does a presentation at the outside ampitheater talking about what we’re going to be seeing that night.  Then, everyone gets to look through very powerful telescopes at the night sky.

That night, there was a full moon, so many of the dimmer stars weren’t visible.  But, we did get to see Saturn and a very close up & personal view of the Moon.

They also do tours of some of the larger telescopes during the day.  Next time, we’ll have to do that.

Sunset at McDonald Observatory

Some of the telescopes we looked through at the Observatory.

Full moon over McDonald Observatory


Once we saw all we could and enjoyed the cool evening, we drove back to Marfa.  Our friend Joe Nick Patoski’s wife, Chris, was playing in Joe King Carasco’s band that evening at Padres.  (You old-time Austinites will remember Joe King quite well.)

We arrived about halfway through the show.  We hadn’t seen Joe King in a while.  He hasn’t really lost any of his entertainment value. And, yes.  He still wears his crowns.  That night was a classic.

Joe King Carasco at Padres. Marfa.

A la James Brown: Joe King being helped off stage by his “doctor” and Joe Nick in his genie turban waving him good bye.


We finally got back to Marathon at 2am.  So, the plan on getting up at 5am to go back to Big Bend was out.

Day 5.  My birthday.

We finally dragged ourselves out of bed at about 9 am.

Breakfast was at the Marathon Coffee Shop.  It was delicious, and big.  We needed the big for the hike that we had coming.

Steve, as is his habit when it’s on the menu, ordered migas.  I opted for short-stack of pancakes with bacon and hash browns.

Can’t go wrong there.

Steve’s Sunday Morning Breakfast.

Sahar’s Birthday Breakfast. Part 1.

Sahar’s Birthday Breakfast. Part 2.

We packed the car with cold water, and a backpack filled with Gatorade, dried fruit and nuts, and a first aid kit. Off we went to hike Boquillas Canyon.

Boquillas Canyon is down at the tip of the Big Bend where Mexico and Texas are separated by the Rio Grande.  At one time, people were able to cross back and forth pretty freely.  However, in 2002, the crossing was closed.

But first, of course, we had about a 2-hour drive down to the canyon.  So, we stopped often to take photos. Again.

Looking over what used to be a swamp in the Ecoene Period. About 30 million years ago.

Shale. From millions of years of underwater sediment. Chihuahuan Desert.

More Ocotillo Cactus. Chihuahuan Desert.

Spiny Fruited Prickly Pear. Found only in the Chihuahuan Desert.

The far horizon is Mexico.


We finally made our way to Boquillas Canyon.  There were more people there than we had seen in our entire time in Big Bend. Maybe 20. Some were tourists like us.  Others, Mexican Nationals who apparently regularly cross the river to sell trinkets to the tourists.

I would’ve done it, too (in spite of the warnings up in the park telling us not to).  If I had brought any money.  And entertainment was provided by one gentleman singing “Guantanamera” while fishing in the river.  He really did have a great voice.


As we wee beginning the hike, I was struck by some holes in the rock.  I found a sign explaining them.  They are mortar holes cut into the rock.  The indigenous poeples of the area used the mortar holes to grind mesquite seeds, roots, and other grains for food.

Each one of the holes is about 12″ deep.  I don’t know if they were originally cut that deep, or, if over time, the holes were simply worn deeper into the rock.

Fascinating. I love history. And archaeology.

Mortar holes cut into the rock.


First, to go down into the canyon, we had to go up the front side. And with the heat being what it was that day, about 100F on the canyon floor, it was no small feat.

Heading down into Boquillas Canyon. US on the right. Mexico on the left.

Down in the Boquillas Canyon. The cliff face on the right is Mexico.

All river rock up to the cliff face on the Texas side. Shows how high the Rio Grande can get. Very.

Texas on the left. Mexico on the right. Rio Grande/Rio Bravo in the center. Boquillas Canyon

Dogweed growing in the river rock.


We were down in the canyon for a couple of hours walking around, resting in the shade. Watching the burros on the Mexico side.  We didn’t go as far as we would’ve liked because the trail because there was a point where it became very difficult to navigate.  Since my husband & I aren’t experienced hikers, we opted out of getting too adventurous.

What we scaled to go into the canyon. It was an easy trail, but with the heat. Yikes.

So, after each of us downing a full bottle of Gatorade when we got back to the car, we went to Rio Grande Village for lunch.

Rio Grande Village is basically a campground with shower and laundry facilities and a small convenience store.

So, we had a convenience store lunch:

Sunday lunch. Convenience store sandwich, chips, and Powerade.

Since we had managed to work off our rather large breakfasts, as bad as this was, we were grateful to have the food.

Just a little perspective as to where we were.


Then, we headed out to Big Bend for the last time. On this trip, anyway.

Our final look at Big Bend.


So, after going through the Boarder Crossing Checkpoint for the 3rd time, we made it back to the hotel to clean up and enjoy well-earned naps.

Dinner that night was at the 12 Gage, the hotel’s restaurant.  I can describe it no other way than that it’s basically an upscale steakhouse that takes itself a little too seriously.

It’s the big fish in a very small pond.  In fact, it basically eats all the chum.  The other restaurants in town (and there aren’t many) seem to get absolutely no business when the hotel restaurant is open.  Perhaps, when tourism is up, the other places could get the run-off customers who either couldn’t get a reservation (yes, we had to make reservations) or don’t want to pay $200 for dinner for 2.

But, we dove in anyway.

As Steve and I usually do when we go to a more expensive restaurant, we do the whole play.  Appetizers, Main Course, Desserts, maybe a snifter and/or coffee.  We figure, what the hell. We’re already spending the money and more than likely we’ll never come here again anyway.

Needless to say, we don’t do this often.

12 Gage’s menu. I could’ve worked out with this thing.

Bread with Poblano Butter. Very good. The butter was soft and the bread warm.

As always, we started off with cocktails. I don’t know if there was someone new at the bar or the recipes weren’t followed, but our drinks were very underwhelming.

My cocktail. Strawberry Mint Mojito. Meh. I tasted neither mint nor strawberry. Or even lime. Just very well-style rum.

Steve’s cocktail: Prickly Pear Margarita. I think he was shocked at the bright pink color. He drank it, but wasn’t impressed.

Things looked up when the appetizers came.

Sahar’s appetizer. Fried Green Tomatoes with Crab Remoulade. Very good. But not spectacular.

Steve’s appetizer. Shrimp  & Crab Cocktail. He said it was good. I’ll have to take his word for it.

So, on to the main course.  Since we were at a steakhouse, we ordered steaks.  His was beef.  Mine was bison.

Steve’s dinner. Ribeye Steak with Fried Potatoes and Vegetables. He said the steak was really good.

Sahar’s dinner. Bison Steak with Tomato/Leek Jam and Compound Butter. The sides are Spaetzl with Cheese and Vegetables. The steak was huge. Enough for 2 people. I could’ve done without the butter and jam on top. The spaetzl was good. The vegetables were kind of an afterthought.

Dessert.

Steve’s Dessert. Strawberry-Peach Pie a la Mode. He was very happy.

Sahar’s dessert. Flan. It was perfect. Creamy and dense. The best part of my meal.


We ended up with a small box of leftover steak to take back to the room.  It was Monday’s lunch.

Steve & I discussed which meal was the best of the trip. And while it was almost like comparing apples to oranges, we decided our meal at Cochineal was it.  Overall, we felt the quality was better, there was more attention paid to depth of flavor and, most important to me, the vegetables were treated with kindness; not an after thought.

This is not to say we didn’t enjoy 12 Gage.  We did.  But, it just doesn’t seem like it has to or wants to try to be something better.

And then, off to bed.

Final Day.  Monday. Check-out day.

We cheked out of the hotel. And, as we were packing the car, discovered we were taking home more than we came with.

Sigh…

But first, we took a quick walk around Marathon.

The French Grocer. Started in 1920 by the French Family. A very well-stocked grocery. It’s the only one around, so it’s very well stocked. In fact, we bought lunch supplies there.

Quite possibly the greatest tomao plant ever. In front of French Grocery Co., Marathon.


Then, we stumbled upon Eve’s Garden. An Organic Bed and Breakfast.  This place has to be seen to be believed. We were just standing outdise looking around and, Elaine, the caretaker/carpenter, came out and invited us in for a tour.

She said that she and the owners think that they’ll be finished in the next 2-3 years.  I will say, the place is really interesting.  They’re trying to make the building as organic/green as possible.

Eve’s Garden. Front Entrance.

Outside sitting area. Eve’s Garden.

Eve’s Garden

Interior courtyard. Eve’s Garden.

Privacy wall. Interior courtyard. Eve’s Garden.


And, then, it was time to head home.

A final shot of Marathon.


It was a 7-hour drie back to Austin.  We stopped just outside of Ozona (about where we stopped on the way out) at a rest stop and had our final meal of the trip.  Sandwiches made with the leftover steak from Sunday, chips, Peligrino, and fried pies.

Our final meal on the road.


Yeah.  We’ll be going back.


Koshari: The National Dish of Egypt 1

Posted on June 30, 2012 by Sahar

When you mention the word “Koshari” ( كشرى) to an Egyptian, you will likely see someone with a blissful look in their eyes and a smile on their face.  It is regarded by nearly every Egyptian, as well as food historians and enthusiasts, as the National Dish of Egypt.  It’s a wonderful starch-fest of pasta, rice, lentils, and, sometimes, chick peas.  The addition of caramelized onions and a spicy, tangy tomato sauce complete the ensemble.

However, Koshari isn’t Egyptian in origin.  It is said to have come form the Indian dish “Kitchiri” (meaning a dish with rice & lentils) brought to Egypt by British Occupation troops in the late 19th – early 20th Century.  The British troops found the dish filling, delicious, and, most importantly, safe to eat.  The local inhabitants took a liking to this new dish and it became immensly popular.

Additonally, rice isn’t native to Egypt.  So, the Indian origin of the Koshari makes sense.  The Indians got rice from the Persians who most likely learned about it from the Chinese.  Rice wasn’t introduced into Egypt until approximately 1000 BCE. (It seems like a long time ago. But, in this part of the world, it’s a blip in time.) Also, the tomato sauce served with the dish is another Western addition.  Tomatoes & chiles are native to the Americas.  So, Koshari is a great example of what happens when cultures clash – in a good way.

Because it is a vegetarian/vegan dish, it is popular with Coptic Christians during Lent and other religious fast days.

This is a colorful description of how Koshari is served on the street and in the restaurants of Egypt:

“As the Koshary man scoops, he knocks his metal spoon against the sides of the bowls, making the Koshary symphony that you won’t hear elsewhere. When the Koshary man prepares an order of more than four the restaurant fills with sound as if it was a rehearsal for a concert. “The restaurants of Koshary are very noisy. One sits to eat while the Koshary man practices his drums in your ears.”

Abou Tarek, by the way, is the place to go.

(Some information from abissadacooks.blogspot.com; theegyptiancorner.blogspot.com; and, wikipedia.org)

Egypt!


***********************

Now, on to the recipe.


I generally make this recipe with brown rice and whole wheat pasta.  The more traditional recipes are with white rice and regular flour pasta.  Use whatever you like.  Also, chick peas are completely optional.  I like to use them.


The ingredients


1 c. brown lentils, picked over and rinsed

1/2 c. pasta, like elbow, gemelli, penne, etc. (I like to use whole wheat)

1 c. rice (I like brown rice)

1 can garbanzos (chick peas), drained

3 lbs. onion, peeled and sliced thin (about 1/4″ thick)

1/2 c. olive oil

1 tsp. ground cumin

Sat & Pepper to taste


Stewed Tomato Sauce

2 tbsp. olive oil

1/2 c. onion, diced

4 cloves garlic, minced

1 15-oz can crushed tomatoes (I like Muir Glen Fire Roasted)

2 tsp. white vinegar

1/2 tsp. ground cumin

1/2 tsp. cayenne pepper

Salt & pepper to taste


1.  Cook the rice.  Bring 2 cups lightly salted water to a boil and add the rice.  Turn the heat down to low, cover the saucepan, and cook until the rice is done, about 40-50 minutes.  Remove the rice from the heat and set aside.

2.  Meanwhile, cook the lentils.  Bring 4 cups water to a boil and add the lentils.  Cook until the lentils are soft, about 25 – 30 minutes.  Drain and set aside.

3.  Cook the pasta.  Bring 4 c. salted water to a boil.  Add the pasta and stir until the water comes to boil again.  Cook the pasta according to the package directions.  Drain and set aside.

4.  Cook the onions.  This is actually is the longest part of the whole process, but for me anyway, is the best part.  The trick is to be patient when cooking the onions.  I cook them over medium-low to medium heat.  You can cook the onions as little or as much as you like, but the traditional way is to caramelize them.

Heat the olive oil over high heat.  Add the onions.  (I also like to add a teaspoon of salt.  It helps to release moisture from the onions and breaks them down a little faster.)  Turn the heat down to medium-low and cover with a piece of foil. (I find steaming the onions also helps with breaking them down.)  For the first 30 minutes, stir the onions occasionally, making sure you keep them covered.

Onions. The beginning. It's amazing how much they'll have cooked down at the end.

Onions. The beginning. It’s amazing how much they’ll have cooked down at the end.


Keeping the onions covered. I like to cover them for the first 30 minutes of cooking. I find the steaming helps the onions to release their liquid and keeps them from overcooking too quickly. However, it’s up to you.


After 15 minutes. The onions are beginning to wilt.


After 30 minutes. They’re beginning to wilt and quite a bit of liquid has been released.


After 45 minutes. The onions are beginning to brown.


After 1 hour. The liquid is beginning to evaporate and the onions are soft and continuing to brown.


5.  Meanwhile, make the sauce.  Heat the olive oil over medium-high heat.  Add the onions and garlic and saute until the onions are soft.


Sauteing the onions and garlic.


6.  Add the tomatoes and lower the heat to low.  Cover and simmer the sauce for 20 minutes, stirring occasionally.

After adding the tomatoes.


7.  After 20 minutes, add in the cumin, cayenne, vinegar, and salt & pepper to taste.  Set aside until the Khoshari is done.


The finished sauce. It can be served warm or at room temperature.


8.  While the sauce is cooking, the onions will continue to caramelize.  At this point, you will need to begin keeping a closer eye on the onions and stirring them more frequently.

The onions after 1 hour 15 minutes. The browning will be accellerting quickly at this point. Keep a very close eye on the onions at this point.


Onions at 1 hour 30 minues. You can stop at this point if you like. However, I go a little further.


Onions at 1 hour 45 minutes. Perfect.

9.  Once the onions are done, remove them from the heat, take them out of the oil, drain, and spread out on paper towels.  Keep the oil.


Draining the onions. Amazing how much they shrink during cooking.


10.  In the reserved oil, heat the rice, pasta, lentils, and garbanzos over medium-high heat.  Add the cumin, salt and pepper to taste.

Reheating the rice, pasta, lentils, and garbanzos.


11.  Add in the onions and mix thoroughly.  Taste for seaoning and heat through.

Yumminess.


12.  Serve the Khoshari with the sauce on the side.  Or, on top if you like.

Dinner. A dinner that will fill you up.  And, despite the high oil content, it’s olive oil. Monounsaturated fat.


Enjoy! Sahtein!


Real Ragú Doesn’t Come from a Jar 0

Posted on June 14, 2012 by Sahar

Ragú.  The word has been part of the American food lexicon since 1969. (The brand was started by a cheese importer Giovanni Cantisano and his wife Assunta in 1937 in New York. They sold the brand to Chesebrough-Ponds in 1969 for $43.8M.)  Most people know it as the original sauce in a jar (other than Chef Boyardee).  It has, admittedly, been the lifesaver of many a harried mom trying to put a hot meal on the table, college students looking for a cheap meal, and a quick substitute for pizza sauce.

However, I’m here to tell you, that isn’t real ragú.  A real ragú, as any prideful Italian will tell you, is a meat sauce that originated in the Emilia-Romanga region of Italy.  It’s not a brand name.

There are literally thousands of written recipes now for ragú.  In fact, since the original recipe was never written down, no one can say for sure that they know what the original recipe even was. It comes in many variations that are specific to the region where the recipe is developed (a very common thing still in Italy).  Recipes can be with or without tomatoes, include all different types of meats or poultry, contain offal, and be made with or without wine and/or milk.

According to culinary historians, Ragù alla Bolognese follows the origin of ragús in Italian cuisine. The first known reference to ragù as a pasta sauce dates to the  late 18th century, and originated in Imola, near to the city of Bologna.  The first recipe for a meat sauce characterized as being Bolognese came from Pellegrino Artusi and was included in his cookbook published in 1891. Artusi’s recipe, Maccheroni alla bolognese, is believed to have originated from the middle 19th century when he spent considerable time in Bologna.

Artusi’s sauce called for predominantly lean veal filet along with pancetta, butter, onion, and carrot. The meats and vegetables were to be finely minced, cooked with butter until the meats browned, then covered and cooked with broth. Artusi added the sauce could be enhanced by adding dried mushrooms, truffle slices, or finely chopped chicken liver. He further added that when the sauce was completely done you could add as a final touch half a glass of cream to make an even more delicate dish.

In the century-plus since Artusi wrote and published his recipe for Maccheroni alla Bolognese (maccheroni being a catch-all word for pasta in Artusi’s time), what is now ragù alla bolognese has evolved with the cuisine of the Emilia-Romagna region. Most notable is the preferred choice of pasta, which today is widely accepted as fresh tagliatelle (a wide, flat pasta). Another reflection of the evolution of the cuisine over the past 150 years is the addition of tomato, either as a puree or as a concentrated paste, or both, to the original mix of ingredients. Similarly, both wine and milk appear today in the list of ingredients in many of the contemporary recipes, and beef has mostly replaced veal as the preferred protein.

While the number of recipe and ingredient variations are significant, there are characteristic commonalities. Garlic is absent from all of the recipes. So are herbs other than the limited use of Bay leaves in some recipes. Seasoning is limited to salt, pepper and the occasional addition of nutmeg. In all of the recipes meat is the principal ingredient, and while tomatoes are included they are only used as an enhancement to the meat.

(Some historical information from www.wikipedia.org; and The Food Chronology, James Trager, Owl Books, 1995)

***************************

Now, to the recipe.


The Ingredients


Ragú is actually quite easy to make.  It is a sauce that requires patience, however.  From start to finish, this sauce takes about 3 – 3 1/2 hours to prepare.  So, it’s not something you can start when you get home from work.  Nor would I recommend it for the crock pot.  However, you can make extra over the weekend or your days off.  It freezes beautifully.

This particular ragú recipe that I’m using is an adaptation of a recipe I love from Fine Cooking Magazine’s Real Italian Collection (Taunton Press, 2010).


3 tbsp. Extra Virgin Olive Oil

1/2 lb. Prosciutto, thick cut, diced (keep the fat cap on.  It adds a lot of flavor to the final dish)

1 sm. onion, diced

1 carrot, diced

1 rib celery, diced

1 lb. ground pork

2 tbsp. tomato paste

1/2 c. dry white wine

1/2 tsp. red pepper flakes (or to taste)

28 oz can crushed tomatoes (I like Muir Glen Fire Roasted)

1 c. beef or chicken broth

Salt & Pepper to taste

1/2 c. whole milk or half & half

1 lb. Pappardelle, Tagliatelle, or other flat, wide pasta


1.  Heat the olive oil over medium heat in a large saucepan or Dutch oven.  Add the prosciutto and cook, stirring frequently, to crisp the prosciutto slightly and to help render the fat.

The prosciutto. Keep the fat cap. It adds a lot of flavor to the final dish.


Cooking the prosciutto & rendering the fat. Yummy.


2.  Add the onion, carrot, and celery.

The classic mirepoix. Or, in Italian, soffritto.


Saute the vegetables with the prosciutto until they are soft and slightly browned.  About 8 – 10 minutes.  Stir frequently.

Sauteing the vegetables.


Just before adding the ground pork. Note how the vegetables have softened and slightly browned.


3.  Add the ground pork.  Cook until the pork is no longer pink.  it doesn’t need to be browned.  Just have the pink cooked out.

After the pork has been added and cooked.


4.  Add in the tomato paste, white wine, and pepper flakes.  Cook until the paste has been mixed in and the most of the wine has evaporated, about 5 minutes.

After the wine, tomato paste, and pepper flakes have been added.


5.  Add the crushed tomatoes, beef or chicken broth, and some salt & pepper.

**Take care not to add too much salt.  The prosciutto and the broth (if you’re using commercially made) will already have salt.  If you want to omit it until later in the cooking process, go ahead.  You can always add more in later, but you can’t take it out.

Right after adding the tomatoes, broth, and salt & pepper.


Cover the saucepan or Dutch oven and bring the sauce to a boil.  Then, uncover, turn the heat to low, and simmer the sauce for 2 hours.  Stirring occasionally.  The flavors will mellow and mesh together as the sauce cooks.

After 30 minutes.


After 1 hour. This is usually the earliest point where I start tasting for seasoning.


After 90 minutes. Begin stirring more frequently. Again, check the seasoning.


At 2 hours. Notice how the sauce has thickened up and become darker in color.


6.  Add the milk or half & half.  Mix in and continue cooking the sauce for a further 30 minutes.  Stir frequently.

The ragú right after adding the milk.


7.  Meanwhile, cook the pasta.  Use a pot large enough to cook the pasta properly (i.e. keep it from sticking together in the pot) and use salted water.  Cook the pasta according to the package directions to al dente (“to the teeth”).  Drain and set aside.

(I generally don’t rinse my pasta.  I think the starch is important to helping the sauce stick to the pasta. Plus, rinsing pasta loses some of the flavor.  If you want to rinse your pasta, please don’t tell me about it.)

8.  After the final 30 minutes of cooking, remove the ragú from the heat and taste for seasoning one more time.  Serve with the pasta.  If you want to have some Parmigiano-Reggiano or Grana Padano as well, go ahead.  I generally don’t.


Buon Appetito!


Key Lime Pie (with a bonus at the end!) 0

Posted on May 31, 2012 by Sahar

Key Lime Pie is the ultimate symbol of food from Florida. Specifically, the Florida Keys.  No one really knows when the first Key Lime Pies were made or who made them since there’s no documentation.  However, according to historians, the most likely candidate is a ship salvager turned millionaire named William Curry.  He had a cook known only as Aunt Sally.  She supposedly created the pie in the late 19th Century.

Other historians believe that fisherman off the Keys, off to sea for long periods of time, created the pie as a way to help preserve their supplies, especially eggs.

Sweetened condensed milk was used because, until the Overseas Highway was built in 1930, there was a lack of fresh milk, ice,  and refrigeration on the Keys.  To this day, it is the key to making the pie so creamy.

The other main ingredient is, of course, key limes.  The key lime tree is native to Malaysia and most likely arrived in the Keys in the 16th Century with the Spanish explorers.  They are about the size of a golf ball with a yellow-green skin.  Their juice is sweeter than the more common Persian limes.

As a fun little political aside, in 1965, Florida State Representative Bernie Papy, Jr. introduced legislation calling for a $100 fine to be levied against anyone advertising Key Lime Pie that isn’t made with key limes. The bill didn’t pass.

(Some historical information from whatscookingamerica.net)

*********************

Now, to the recipe.

The Ingredients


Of course, the purist, like Rep. Papy, would say that the only true Key Lime Pie is made with fresh key lime juice. And they would be right.  However, many of us don’t have access to fresh key limes, or, if we do, the time to juice & zest about 20 – 30 to make this pie.

I use a combination of fresh lime juice and bottled key lime juice.  The most common brand of key lime juice is Nellie & Joe’s.  However, if you can find fresh key limes, and have the time to prepare them, by all means, use them.

Another question is what kind of crust to use: pastry or graham cracker? My own personal preference is pastry.  More specifically, cookie.  Which is what I do in this recipe.  And, because the crust recipe here is essentially a cookie recipe, it isn’t going to behave like a regular pie crust.

Meringue, whipped cream, or plain?  Again, it’s up to the baker.  I like meringue.  It’s also most likely the original topping since heavy cream wouldn’t have been available in the Keys before the 1930’s.  In this recipe I use an Italian Meringue.  It’s made with a hot sugar syrup as opposed to granulated sugar.  It makes an excellent, stable meringue that is almost reminiscent of a fluffy cake frosting.

One more thing.  True Key Lime Pie doesn’t have green food coloring.  The color of the pie should be a light yellow-green color.  If you see a pie that has a fluorescent green hue, walk away.  It’s most likely a pre-made mix.

Also, I prefer a more tart pie than many people.  Many of the key lime pies I’ve tasted really put the emphasis on sweet rather than lime.  I feel I’ve remedied that here.  It’s more of a sweet-tart flavor.


Shortbread Cookie Crust

2c. (9 oz.) all-purpose flour

1 tsp. baking powder

1/2 tsp. salt

1 tbsp. citrus zest (optional)

1/2 c. light brown sugar

1 c. (2 sticks) unsalted butter, softened


Key Lime Filling

2 cans sweetened condensed milk (don’t use non-fat. Yuk.)

3 egg yolks

1 1/4 c. lime juice (I use a combination of fresh Persian lime & bottled key lime in this recipe. However, you can use all fresh of one or the other)

2 tbsp. lime zest


Italian Meringue

1 1/4 c. sugar

1/2 c. water

2 tbsp. light corn syrup (keeps the syrup from “sugaring up” or solidifying)

6 egg whites, room temperature

1/4 tsp. cream of tartar (if you don’t have this, it’s all right.  However, it does act as a stabilizer for the whites)


1.  Make the crust: Sift together the flour, baking powder, and salt into a small bowl.  If you’re using the zest, toss that into the dry ingredients as well.

Weighing the flour.


Zesting the limes. The Microplane is a perfect tool for this. It takes off the outer peel while leaving behind the bitter white pith. If you don't own a Microplane, go get one.


The dry ingredients and zest mixed together.


2.  In a mixer bowl, beat the butter and sugar together on medium-high speed until the mixture becomes light and fluffy.

The butter & sugar in the bowl.


Beating together the sugar & butter.


You want a fluffy, aerated mixture. This will help with the texture of the crust.


3.  Turn the speed down to low and gradually add the flour mixture.

Adding the flour to the butter & sugar


Keep mixing until the flour is completely incorporated.


4.  Turn the dough out onto a large sheet of plastic wrap and shape into a slightly flattened disk.  Wrap the dough tightly in the plastic wrap, place in the refrigerator, and chill for at least 3 hours.

The dough ready for the refrigerator


Note: At this point, you can simply use this dough for cookies.  Delicious.


5.  After you’ve let the dough chill, take it out of the refrigerator and let it sit for about 15 – 20 minutes to let it soften slightly.  When you roll out the dough, you want it to be firm but not rock-hard.

Dough ready for rolling.


6.  Unwrap the dough and lay it on a floured surface and lightly sprinkle the top with more flour.  Alternately, you can sandwich the dough between 2 pieces of wax paper or plastic wrap.

7.  Roll the dough out, starting from the center and working out to the edges.  Turn the dough a 1/4 turn each time you pass the pin over it.  This will help make a more even thickness as well as, especially if you’re using a floured surface, keeping the dough from sticking.  Use more flour if you need to, but try to use as little as possible.  Too much flour will make the crust tough and dry.

Note:  Again, remember, this is a cookie dough.  It is not going to behave the same way as a regular pie dough.  Because of the high butter content, this dough will get very soft, very fast as you work it.  If the dough cracks while you’re rolling, just press it back together.  If you give up on trying to roll it out (and believe me, I have a couple of times), you can simply take pieces of dough and press them into the pie plate.  Trust me, though, the results are worth a little frustration.

Getting ready to roll the dough.


8.  When you’re done rolling, take a 9-inch pie plate and measure the dough.  There should be approximately 3 – 4 inches of extra dough around the outer edges of the pie plate.

Measuring the pie dough.


9.  Now for the fun part.  Carefully flip the dough onto the pie plate and shape the dough into the plate.  Trim any dough overhanging the edges to a 1″ overhang. (if you don’t have any overhang, it’s all right.) Use whatever scraps you have to patch up any holes, tears, or spots and the edge that are a little short of dough.

Save the scraps for cookies.

Getting ready to flip the dough


A not entirely successful flip


If your dough looks like this after you've flipped it into the pie plate, don't despair. All will be well.


After a little repair work. See? I told you it all comes together.


10.  Tuck under the overhang around the edges. (If you have any.  The most important thing is that the crust is as even a thickness as possible.).  Finish the edges as you like.  Use a fork to prick a few holes in the crust and place it in the freezer for at least 30 minutes.

Pie crust ready for the freezer. Freezing the crust will help to keep it from melting & burning in the oven when you par-bake it later.


11.  Meanwhile, preheat your oven to 350F.  Grease a piece of foil or parchment paper on one side with spray.  Set aside.

12.  Take the pie crust out of the freezer, place it on a baking sheet, and press the foil or paper down into it.  Fill the foil or paper with pie weights (i.e. dried beans, lentils, or rice) and place the pie crust in the oven.

Raw crust filled with pie weights ready for the oven.


13.  Par-bake the crust for 30 minutes.  Take the crust out of the oven, carefully remove the foil or paper and the weights.  Wrap the edges in foil, if needed, and bake an additional 8 – 10 minutes.

Note:  There will be a bit of melting of the crust, especially the outer edge.  It’s inevitable given the fact this is cookie dough.  When the crust comes out of the oven, it will be very soft and fragile.  Hence, the cookie sheet.

Finished par-baked crust


14.  Take the crust from the oven and let it cool completely.  At this stage, of you like, once the crust is cool, you can carefully wrap it in plastic and place it in the refrigerator.

15.  While the crust is cooling, you an make the filling.  In a large bowl, whisk the egg yolks to break them up.  Add the condensed milk, lime juice, and zest.  Whisk until you have an even, well combined mixture.  The filling will thicken upon standing.  Set aside or cover and refrigerate.

Egg yolks & lime zest.


After adding the lime juice


After adding the sweetened condensed milk. Yummy stuff.


16.  Once the crust has cooled completely, wrap the edges in foil (to prevent any further browning)

Wrapped edges.


Carefully pour in the filling.

Ready for the oven.


Place the filled pie on the baking sheet (if you haven’t done so already) and put the pie back into a preheated 350F oven for 35 – 45 minutes. If your oven has a hot spot, and most ovens do, rotate the baking sheet about halfway through the initial baking time.

The center should be a bit wobbly when you take it from the oven.  It will firm up as the pie cools.


Note:  This is a very important thing to remember.  When you are making ANY type of cream pie, you must pay attention to the baking time & doneness of the filling.  I didn’t the first time around when I was making the pie for this post.

I had workmen in my house that day and became distracted.  So, here is what happened:

What you don't want to see. An overcooked cream pie.


The overcooked proteins have basically squeezed out all the liquid causing the filling to separate.


So, what you’ll end up with, if you aren’t paying attention, is essentially sweet-tart scrambled eggs.  And I’m fairly certain none of you will be going for that.  The pie will still taste good, but the texture will be, well, funky.

Eat the pie yourself or dress it up and give it to someone you don’t like very much.

Here is what you want to see:

A smooth, creamy pie


Let the pie cool completely.  (I usually cover it once it’s cooled and place it in the refrigerator overnight.)


17.  Make the meringue: Separate the eggs using the 3-bowl method (see my blog post “Mom’s Favorite” on how to do this).  Place the egg whites & cream of tartar in a mixer bowl and set aside.

Egg whites & cream of tartar ready to go.

Make the sugar syrup:  In a medium saucepan, mix together the sugar, corn syrup, and water.  Cook over medium heat, stirring until the sugar dissolves.  Bring to a boil.

Sugar syrup getting ready to boil


18.  Once the syrup reached 240F on a candy thermometer (soft ball stage):

Syrup at 240F


begin whisking the egg whites on high speed until they are frothy:

Frothy egg whites.


19.  Once the sugar syrup reaches between 245F & 250F (firm ball stage), remove the saucepan from the heat.

Syrup at 250F. You don't want it to get any hotter than this or the whites will too stiff to work with later.


Turn the mixer down to medium speed.  CAREFULLY AND SLOWLY pour the hot syrup into the whites, avoiding the whip.

Carefully pouring the sugar syrup into the whites.


(A hot syrup burn is really, really painful.  There’s a reason pastry chefs call this stuff napalm.  Do not give this to the kids to do, be sober, and pay attention.)

Once you have poured in all the sugar syrup, turn the mixer speed up to medium-high and continue whisking the whites until they are firm and shiny.  The bowl should be just warm to the touch when they’re done.

Whisking the egg whites after all the syrup has been added


The finished egg whites. These could be used as a cake frosting at this point.


20.  Turn your oven on to broil (you may want to take a rack out) or have a torch ready to go. I usually set my oven on “Broil” setting and turn the temperature to 450F.

21.  Pile the meringue on top of the pie.  Spread it all the way to the edge of the crust and smooth or spike it out as you like (there will be A LOT of meringue).

An almost comical amount of meringue.


Ready for the oven.


Place the pie in the lower part of the oven and let the meringue brown.  Watch it carefully, though.  It can burn quickly.  About 60 – 90 seconds is all it will take.

If you have a torch, brown the meringue with that if you like.  You can direct the heat more directly and make the browning more even.

PIe! Yummy!


A cross section. It was really, really good.


Store any uneaten pie, covered, in the refrigerator.  It’ll keep for about 3 – 4 days.


Enjoy!


P.S.  Remember what I said about saving the scraps for cookies?

1.  Line a baking sheet with parchment paper.  Have your oven preheated to 350F.

2.  Roll out the leftover dough into a 1/8 – 1/4″ thickness, depending on how crunchy or soft you like your shortbread cookies.

3.  Cut the cookies out into your desired shape.

Cutting out cookies


4.  Place the cut cookies onto the baking sheet about 1″ apart.  If you like, sprinkle them with a little turbinado (raw) sugar before baking:

Ready for the oven


5.  Bake the cookies for 8 – 10 minutes.  Depending on the thickness and how brown you like them.  Turn the baking sheet about halfway through the initial cooking time.

6.  When the cookies are done, let them cool slightly on the baking sheet then transfer to a rack.  The cookie yield depends on how much leftover dough you have and how thick you make the cookies.

All done!


Bonus!


A Pie Primer 0

Posted on May 15, 2012 by Sahar

Pie. Something everyone seems to love. They can be sweet or savory. Snack, main meal, or dessert.  And, I have no doubt many of us have eaten pie for breakfast more than once. Especially during the holidays.

Pie in form or another has been around for millennia.  The original pies had crusts that were several inches thick that were simply used as cooking vessels.  The crusts weren’t actually eaten.  Historians say that the roots of pie can be traced back to the Egyptians of the Neolithic Period, around 9500BCE.  These early forms of pies were essentially free-form made with oat, wheat, rye, barley, and filled with honey baked over hot coals.

The first pies were called “coffins”, meaning basket or box.  They were savory meat pies with tall, straight-sided sides with tops and bottoms.  Open crust pies were known as “traps”.  These were baked more like what we now know as a casserole and were made with meats and sauce.  Again, the crust itself was the cooking vessel and was inedible.  A tradition of these early pies was carried on by the Greeks. Historians believe that the Greeks actually originated pie pastry. The pies during this period were made by a flour-water paste wrapped around meat; this served to cook the meat and seal in the juices.

The Romans, sampling the delicacy, carried home recipes for making it (a prize of victory from a conquered Greece). The wealthy and educated Romans used various types of meat in every course of the meal, including the dessert course. According to historical records, oysters, mussels, lampreys, and other meats and fish were normal in Roman puddings. It is thought that the puddings were a lot like pies.

English women were baking pies long before the settlers came to America. Pie was an English specialty that was unrivaled in the rest of Europe. Two early examples of the English meat pies were shepherd’s pie and cottage pie. Shepherd’s pie was made with lamb and vegetables, and the cottage pie was made with beef and vegetable. Both are topped with potatoes.

The Pilgrims brought their favorite family pie recipes with them to America. The colonist and their pies adapted simultaneously to the ingredients and techniques available to them in the New World. At first, they baked pie with berries and fruits pointed out to them by the Native Americans. Colonial women used round pans literally to cut corners and stretch the ingredients (for the same reason they baked shallow pies).

Pioneer women often served pies with every meal, thus firmly cementing this pastry into a unique form of American culture. With food at the heart of gatherings and celebrations, pie quickly moved to the forefront of contests at county fairs, picnics, and other social events. As settlers moved westward, American regional pies developed. Pies are continually being adapted to changing conditions and ingredients.

(Some historical information from http://whatscookingamerica.net/History/PieHistory.htm)

****************

A few notes on making pie crust: Pie crusts are fundamentally easy to make.  However, they are also one of the most seemingly complicated recipes to master.  There are so many things that could keep you from pie crust success: overworking the dough, a crust that shrinks when baked, a crust that isn’t flaky.

Pie dough, for the most part, if your treat it right, is quite forgiving.  If it tears, it’s easily patched.  You can trim it and add to places that don’t have enough dough (especially for the rim of the crust).  If the crust gets soft while you roll it, you can wrap it and place it back in the refrigerator to rest.  It’s easily frozen.

There are just a few rules to follow when starting a crust:

1.  Make sure the fat you use (lard, shortening, butter) is cold. The reason for this is that the fat doesn’t melt when you work it into the dry ingredients.

2. Use ice water.  This will also keep the fat from melting.  However, don’t use too much because your dough can become tough.  Too little, the dough won’t hold together.

3.  Don’t overwork the dough. If you overwork the dough, you’ll develop the gluten (fine for bread, not for pastry).

4.  Give the dough adequate rest time.  This allows the gluten proteins to rest and the moisture to distribute evenly in the dough.

5.  When you make the dough, you want to see bits of fat and keep it as cold as possible until you put in the oven.  As the crust bakes, the fat melts and creates steam.  The steam in the dough is what creates the flaky crust.


There will be more tips as you go through the recipe.


Mixed Berry Pie with Lattice Crust


The Ingredients


Crust

2 2/3 c. (12 oz.) all purpose flour (the best flour for pie crusts)

1/2 tsp. salt

1 tsp. sugar

1/2 lb. ( 2 sticks) plus 2 tbsp. cold unsalted butter, cut into approximately 1/2″ pieces

5 – 8 tbsp. ice water, as needed


Filling

7 c. fresh washed berries (you can use any mix of berries you like, or just one berry)

-or-

3 bags frozen mixed berries (ditto.)

3 tbsp. cornstarch

3 tbsp. tapioca

-or-

6 tbsp. tapioca flour

1 1/4 c. sugar

1/4 tsp. ground ginger

1/4 tsp. ground nutmeg

-or-

1/2 tsp. cinnamon


1 tbsp. cold unsalted butter, cut into 1/4″ pieces

1 egg yolk mixed with 1 tbsp. water


1.  Make the crust:  If you are making the crust by hand, mix together the flour, sugar, and salt in a medium bowl

Weighing the flour.


Add the butter and press it between your fingers into the flour.  You want to have little disks of butter.  Add in just enough ice water (about 5 tablespoons to start) and carefully toss the ingredients together.  You want the dough to just come together when you press it in your hand.  If the dough is dry, add more water, a tablespoon at a time, until the dough holds together.

If you’re using a food processor (as I did for this recipe), pulse together the dry ingredients:

Dry ingredients pulsed together


Add the butter:

Butter ready to be incorporated into the flour


Do 2 or 3 quick pulses to break down the pieces of butter and begin incorporating it into the dry ingredients:

Butter & Flour after pulsing


You want to have pieces of butter visible.  This is what helps make the crust flaky:

The pieces of butter in the flour.


Add 5 tablespoons of the water and do a few more quick pulses.  Add more water if needed, 1 tablespoon at a time.  Again, you just want the mixture to come together:

After the water has been added


The dough just coming together after being squeezed in my hand


2.  Separate the dough into two equal pieces.  I like to weigh the dough so I’ll get the disks as even as possible:

Weighing the dough


Press the dough into disk shapes and wrap them tightly in plastic:

The dough ready for the refrigerator. Notice the pieces of butter in the dough. This is what you want to see.


Place the dough in the refrigerator and let it rest for at least 2 hours.


3.  Meanwhile, make the filling. (If you are using fresh berries, do this just before you roll out the crust; if you’re using frozen, do this about an hour before rolling out the dough.)

In a large bowl. toss the berries with the cornstarch, tapioca, sugar, ginger and nutmeg.

The berries and spices, etc. ready to mix


Berries after mixing. Now, let them sit. Stir occasionally.


Set the berries aside and let them macerate. Be sure to stir the berries occasionally so the dry ingredients are distributed evenly.  The have a tendency to settle at the bottom of the bowl otherwise.

4.  Remove one of the disks of dough from the oven and let it sit for about 5 to 10 minutes to warm and soften slightly.  (You want the dough to be firm when you roll it out, but not rock-hard.)

Unwrap the dough and lay one disk on a lightly floured surface.  If you like, you can place a piece of plastic or wax paper over the top of the dough as well.

Getting ready to roll the dough


5.  Roll out the dough starting at the 12 o’clock position.  Roll away from you and then back towards you at 6 o’clock.

Rolling the dough.


Rotate the dough 1/4 turn.  Repeat.  By doing this, you’re making sure the dough doesn’t stick at the bottom (lightly flour if necessary) and you’ll roll out the dough more evenly.

Picking up the dough and rotating it 1/4 turn as I'm rolling


Be sure to apply equal pressure over the whole surface of the dough to keep as even a thickness as possible.  Just roll up to the edge of the dough, not over.

Rolling the dough.


Still turning the dough 1/4 turn after each pass with the rolling pin. This will also help you better gauge if you need any more flour as you roll. If you add too much, the dough can become dry and tough.


6.  Remove the plastic or wax paper (if using) from the top of your dough.  Place your pie plate upside down in the center of the dough to measure it’s diameter.  Ideally, you want the dough to extend out at least 3 inches on all sides.

Measuring the rolled dough. It's about 1/8" thickness at this point


Take the pie plate off the dough and set aside.

Very lightly flour the top of the dough.  Take the rolling pin from one end and begin to carefully to roll the dough around the pin:

Rolling the dough over the pin.


Take the pin to the pie plate, hold it over one side and carefully unwrap the dough by again rolling the pin across of the top of the pie plate. (Don’t press down on the edge of the plate.  You’ll run the risk of cutting the dough.)

Transferring the crust into the pie plate


7.  Start shaping the pie dough into the pie plate by lifting the edges and setting the dough into the plate.  Don’t press or stretch the dough.  Not only will it tear, but it will also shrink during baking.

Shaping the dough into the pie plate


Shaping the dough into the pie plate


Pie crust in the pie plate. Ready for the refrigerator.


Once you have the pie crust in the pie plate, trim the outer edges to a 1″ overhang.  Use the scraps to patch any holes or cracks in the dough.  Place the pie plate in the refrigerator to rest as you roll out the second piece of dough.

8.  Unwrap the dough and follow the same rolling instructions from Step 5.

9.  Either by eye (if you can do this, more power to you) or with a ruler (my preferred method), cut 10 strips of dough 3/4″ wide each.

Measuring & cutting the dough for the lattice top


Because I'm terrible at spacial stuff


10.  Mix the berries one more time (and you should’ve been doing this all along anyway), and remove the pie plate from the refrigerator.  Carefully fill the pie plate with the berries and dot the top with the butter.

The berries after a bit of maceration time.


Berries and butter in the crust ready for the lattice top


11.  Lay five strips of dough across the top of the pie, spaced evenly apart.  Be sure there is some overhang off the sides, especially the center.

Beginning the lattice top


Pull back alternating strips of dough and place a piece in the center:

Pulling back alternating strips of dough


Laying the top piece.


Lay the strips back down.  Again, fold alternating strips of dough and lay another strip of dough across.  Do this 3 more times.  Then, you’ll have a lattice top:

The lattice top. Almost finished.


Trim the edges back to a 1″ overhang, tuck the edges back under the rim of the pie crust and crimp the edges as you like.

All shaped, glazed, and ready to go.


Brush the crust with egg wash and, if you like, sprinkle on a little turbinado (raw) sugar or crystal (decorating) sugar.  Place the pie in the refrigerator for an hour or in the freezer for 20 minutes.

12.  Meanwhile, line a large baking sheet with foil and place it in the oven.  Preheat the oven to 425F.  Carefully take the pie out of the refrigerator or freezer and carefully place it on the baking sheet in the oven.  Immediately turn the temperature down to 375F.  Using the preheated baking sheet helps the bottom of the pie seal quickly.

Pie ready for the oven. The foil around the edges of the pie is an option. My oven bakes hot, so I like to use them.


If you like, you can wrap the edges of the pie with some foil to keep the edges of the crust from browning too quickly.  If the top is browning too quickly, you can place a piece of foil, shiny side up, to keep it from over-browning.

Bake the pie for 60-75 minutes.  You want to see juices bubbling from the center, that way you know the pie is cooked through.

By the way, there will be a lot of juices and this pie will be a little messy.  Hence the foil on the baking sheet.

13.  Carefully remove the pie from the oven and let cool for at least 2 hours to let the pie set up.

The finished pie. Notice the lovely juices. Yummy.


Enjoy!


Mom’s Favorite 0

Posted on April 30, 2012 by Sahar

Angel Food Cake has always reminded me of my Mom.  Why?  Because it’s her favorite.  Because it’s something that makes her happy. Because it’s something seemingly delicate yet strong.

Her mother made it for her birthday every year with chocolate sauce.  If I happen to be with  Mom on her birthday, I always make Angel Food Cake.

I also like it because it’s delicious.  It tastes a little like toasted marshmallows to me.

***********************

Some food historians believe that the Angel Food Cakes were likely baked by African-American slaves in the early to mid 19th Century, since making this cake required a strong beating arm and lots of labor to whip the air into the whites.  Angel Food Cakes are also a traditional African-American favorite at post-funeral meals.

In “Mrs. Porter’s New Southern Cookery Book, and Companion for Frugal and Economical“, published in 1871, has a recipe for “Snow-Drift Cake”. A similar recipe appears in 1881 in a book by Abby Fisher, the first Black American woman and a former slave from Mobile, Alabama, who recorded her recipes in a cookbook called “What Mrs. Fisher Knows About Old Southern Cooking, Soups, Pickles, Preserves, Etc.”. Her book has a cake recipe named “Silver Cake”.

The Original Boston Cooking School Cook Book” by Mrs.D.A. Lincoln published in 1884 had a recipe for “Angel Cake” mentioning the name for the first time. In Fannie Merritt Farmer’s 1896 updated version of the “Boston Cooking School Cook Book“, she uses the same recipe and calls the cake “Angel Food Cake.”

(some historical information from Wikipedia)

*****************

There is the school of thought that Angel Food Cake was so named because of it’s lighter color and texture.  It is suitable for the Angels to eat.  On the other hand, it’s slightly more decadent counterpart, Devil’s Food Cake, is darker, richer, and is considered more sinful. Exactly what the Devil would eat.

It reminds me of Muhammad Ali’s statement, ” Angel food cake is the white cake, but the devils food cake is chocolate. When are we going to wake up as a people and end the lie that white is better than black?”

I just had to add that.  It’s always stuck with me.

*******************

Once again, now to the recipe:

Now, to be honest, an Angel Food Cake isn’t for the cake-making novice.  There are so many things that could, can, and will go wrong if you don’t have the confidence and expertise when you bake.

Hell, things could still go wrong even if you do have plenty of baking experience.  I can tell you that with all sincerity.


Angel Food Cake Ingredients


1/2 c. 10x, or Confectioners, sugar

1 c. Pastry Flour (I admittedly use bleached in this recipe.  Just this recipe)

10 ea. Egg Whites (be sure they’re room temperature)

1/2 tsp. Cream of Tartar

2 tsp. Vanilla or Almond Extract (be sure to get pure extract, not imitation flavoring)

1 c. Granulated Sugar


1.  Preheat the oven to 350F.

2.  Sift together the 10x sugar and the pastry flour.  Set aside.

The sifted 10x sugar & pastry flour


When you measure out the pastry flour and 10x sugar, be sure to use the scoop & sweep method of measuring (see “Baking the Perfect Biscuit”, 12/18/11).  Otherwise, your cake runs the risk of having too much dry ingredient weight and you’ll deflate the whites and end up with a heavy cake that won’t rise.

2.  In a large mixer bowl, pour in the egg whites.

The 3-Bowl method of separating eggs.


There is a kind of art to separating eggs.  When you want egg whites, that’s all you want, egg whites.  Any additional fat (i.e. yolks) in the whites will keep them from potentially reaching full volume. Hence the 3-bowl method for separating egg whites.

You break the egg into one bowl.  If the yolk isn’t broken, you carefully lift it out of the bowl  and place it in the second bowl.  Then you pour the white into the third bowl.  If the yolk breaks, you pour the whole egg in with the yolks.  If there is any yolk left in the first bowl, wash it out or get a clean bowl.

By using this method, you’ll always have pure egg whites ready for your cake.

Cover the yolks and use them for something else.  Like a very rich omelet or lemon curd.


3.  The next thing you want are for your egg whites to be at room temperature.  This allows for the proteins in the whites to relax and allow the strands to be broken so they will incorporate more air as you whip them.

Add the whip attachment to your mixer (or break out your hand mixer).  Add the cream of tartar to the whites (this helps with the stabilization of the whites as you whip them).  Begin beating the whites at medium-high speed until they form soft peaks. Add the extract.

Just starting to whip the egg whites.


Frothy stage.


Almost to soft peak stage. Notice how the whites are becoming shinier and the bubbles are getting smaller.


Egg whites at soft peak stage. When you pull the whisk or beaters out of the whites, there will be a distinct peak, but it will bend a bit. And the egg whites are still soft.


4.  Continue whisking the whites until they form stiff peaks.

Egg whites beaten to stiff peaks. The whites will have a bit of a shine and the peaks will stand straight when you pull the whisk or beaters out. The whites will also feel almost heavy.


When you get to still peak stage, you want to be sure not to over beat the whites.  If you do that, the whites will begin to separate.  The whites will dry and the liquid will seep out.  There is no saving it.  You have to start over if this happens.


5.  Lower the speed of the mixer to low and slowly pour in the granulated sugar.  You don’t want to put all the sugar in at once because you want to give the whites a chance to dissolve the sugar and mix in more evenly.

Incorporating the sugar.


Raise the speed again to medium-high and continue beating the whites until they become stiff and shiny.  Again, take care not to over beat.

The beaten, sweetened egg whites. Just lovely.


6.  Carefully turn the whites out into a large, shallow bowl.

The egg whites in the bowl. You have to be careful when transferring because you don't want to deflate the whites.


Sift the reserved flour and 10x sugar mixture in 1/3rd’s over the whites and fold the dry ingredients into the whites.

Folding is a method of mixing that is much more gentle (if done properly) that will keep the deflation of the whites to a minimum.  Because the millions of air bubbles in the whites are what make the cake rise (hot air rises), you want to deflate them as little as possible.


Folding: Step 1


To fold the dry ingredients into the whites, Step 1:  Take a rubber spatula and put it into the center of the whites.

Folding: Step 2


Step 2: Slide the spatula underneath the whites and begin to bring it up the side.


Folding: Step 3


Step 3: Bring the spatula up over the tops of the whites and fold the whites back down into the center.  Turn the bowl a 1/4 turn and repeat until you have all of the dry ingredients incorporated.  Try not to over mix. Be as gentle as possible.


After the dry ingredient have been folded into the whites.


7.  Carefully move the batter into an ungreased Angel Food Cake Pan:

2 pieces of an Angel Food Cake pan: The Bowl and Chimney/Base.


The pan together. The chimney is to help with more even baking of the cake. This cake pan belonged to my Great Aunt Arlene.


There are two main reasons you don’t want to grease the pan: a) because you don’t want any fat to impede the rising of the whites; and b) the whites will use the dry pan to hold on to and even use it to climb up the sides of the pan during baking.


The cake ready for the oven


8.  Bake the cake for 35 minutes, or until the cake springs back when touched on top.

Cake fresh from the oven. The top will have a slightly crispy texture.


9.  As soon as possible after the cake is taken from the oven, invert the cake pan onto a narrow-necked bottle (a wine bottle is perfect).  This will help keep the deflation of the cake to a minimum (by keeping it it from collapsing under it’s own weight).  There will be some deflation as the cake cools no matter what because as the air in the cake cools, the lighter hot air dissipates and the heavier cool air takes its place.

Science!

Cooling the cake over a rather nice merlot.


Leave the cake in this position until it is completely cooled.


10.  When the cake is completely cooled, run a knife around the outer edge of the cake to help release it from the bowl of the pan.  Pull, carefully, on the chimney and pull the cake out.

Cake!


At this point, you can do one of two things to finish releasing the cake: a) Run a knife around the chimney and around the base to release the cake; or, do what I do, and, b) simply run a knife around the center and cut pieces off as needed.  Then I store the uncut cake in the pan and cover it.

Wish Mom was here right now.


Sorry about the lighting. My bulbs seem to be a little yellow.  I swear the cake is white.

This cake, by the way, is excellent with chocolate sauce and strawberries.  Mmm…


Enjoy!


Points East: A Chronicle 2

Posted on April 24, 2012 by Sahar

Well, my goal of  posting each day while I was on the East Coast didn’t materialize.  Surprisingly, for one of the most wired cities on the planet, my internet access was spotty.  Then, when I finally arrived home, I realized the monumental task of editing and labeling the photos I took. So, yeah. I went a little shutterbug crazy.  But the results, I’d like to think, are worth the wait.

Admittedly, I did get a little artsy with some of the photography.  These iPhone camera apps are great.

Not all my photos will be of food.  I’ll be adding a little scenery, too.  Why the hell not.

********************************

On our first full day, Sister Haneen took Husband Steve & I up to the Hudson Valley to the FDR Library & Museum.  We’d never been that far upstate so we were looking forward to it.  It didn’t disappoint.  It was a lovely, warm day.

Husdon River Valley behind Springwood, FDR's home.


Unfortunately, we weren’t allowed to take any pictures inside Springwood.  Too bad, really.  It’s quite lovely inside. It’s pretty much just stuck in the 1940’s.

But, as was typical of large homes built in the 19th century, the kitchen was separate from the rest of the house.  We couldn’t go inside, but I could at least get a picture:

Kitchen at Springwood.


For those of you who are history buffs, like me, here’s FDR’s globe:

FDR's globe.


It was neat looking at a globe with countries that no longer exist.


After we were finished there, we got directions to the Eveready Diner. Apparently Guy Fieri filmed his show there once. I tried not to hold that against them.

Eveready Diner. Hyde Park, NY


I had the French Dip. It wasn’t the best I’d ever had.  But, the food was good enough and the atmosphere was fairly quiet (but then, it was almost 3 in the afternoon). They’re apparently known for their pastries and desserts that they make in-house.


On our first foray into Manhattan, Husband & I enjoyed a lovely lunch at Eataly in the Flatiron District.

The Flatiron Building


Union Square Park. Across from Eataly. Flatiron District.


Admittedly, we indulged.  Our appetizer (or, antipasti) was a ball of fresh mozzarella with fleur de sel, very fruity olive oil, and fresh basil.

Our appetizer at Eataly


Husband Steve had a lovely sea scallop with the coral broiled with orange-fennel butter.

Husband Steve's Lunch.


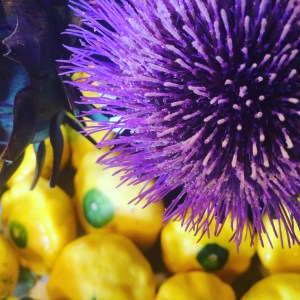
My lunch was fresh sea urchin with a lemon vinaigrette.

The Author's Lunch


We finished with the insalada tricolore.  It was wonderful.

End Of Lunch Salad

Eataly is a sensory delight.  Even if Italian food isn’t your favorite.  The fresh food counters, the packaged foods, the hundreds of different dried pastas, and all the restaurants make a trip to the grocery a pleasant experience again.  That is, of you go before or between the lunch and dinner rushes.

Fresh meat counter at Eataly


Seafood counter at Eataly


Fresh Greens. Eataly


The next day, we took a trip to the Seventh Level of Hell. Otherwise known as Times Square.

Times Square.


Andy Warhol Statue near Times Square. Enjoying its 15 minutes of fame.


We headed to the Edison Cafe for lunch. It’s in the Edison Hotel right off of Times Square near the Theater District.

Arches inside Edison Cafe. Old school.


Husband Steve had the Reuben:

Reuben at Edison Cafe


I had my usual whenever I go to a deli,  a Corned Beef on Rye. Their corned beef was dry, but the flavor was good.

Corned beef on rye.


Now to share a little culture.  Husband Steve & I took a long afternoon and went to the Metropolitan Museum of Art (The Met). I was excited because the museum just re-opened it’s Islamic Art wing as well as re-designed and refurbished its American Art wing.  Can’t go wrong there.

Folio page from a Qu'ran. 14th Century Iraq.


Mihrab. Iran. 14th Century. (Marks the direction of Mecca in the mosque)


Still Life: Balsam Apples with Vegetables. Charles Peale, 1820-1830


Madame X. John Singer Sargent (one of my favorite American artists). There's a book about this painting. Get it. It's great.


Can't get much more American than this. Washington Crossing the Delaware. Emanuel Leutze. 1851


On our way to Penn Station to catch the train back to New Jersey, we came across Cupcakes by Melissa

Itty bitty Cupcakes by Melissa


These were delicious little literally bite-sized cupcakes that come in 11 regular flavors and one “special flavor of the month”.  We picked up a dozen to take back to share with Sister Haneen & Brother-in-Law Mark.

Closer view of Melissa's cupcakes


If you’re like me, you’ll be able to eat these in one bite. If you’re dainty like my Mom, two bites.


The next day, strolling through Chinatown, as always, I found some fun and interesting foods

Lovely little dried veggies and seafood. Chinatown.


Almost bought these for the hell of it.


Dried salted squid.


The next day, a little more culture. MoMA

Still Life with Apples. Paul Cezanne


Starry Night. Vincent Van Gogh.


Waterlilies. Detail. Claude Monet

After MoMA, Steve & I went with our friend Rorie (who graciously came down from Boston for the day) to a place I’ve been wanting to try for years: Sake Bar Hagi.

Sake Bar Hagi


They’re a late night place. Open at 5:30 pm until 3 am.  You go down a stairwell to essentially an underground lair. We discovered the day before (during a bar crawl with Haneen & Mark) that if you don’t get there essentially when they open, count on at least a 45-minute wait. Minimum.  So, we were there promptly at 5:30 and were the first table seated for the night. The place was packed within 20 minutes of our arrival.

Tako Yaki with Bonito. Essentially fried balls of dough with octopus. Yum.


Wasabi Dumplings. Horseradishy.


Yakatori. Wagu Beef; Chicken Skin; Pork Belly. Always delicious.


Softshell Crab Tempura. We ordered this twice.


Grilled Rice Cakes. One was filled with shad roe (an acquired taste) and the other was salmon.


Front: Deep fried Pork Belly (can't go wrong there); Back: Shrimp Tempura. By this point, we were hurting


When we left, about 90 minutes later, the line was up the stairs and out the door.

If you get an opportunity to go to Hagi, do it.  The food’s great, the beer’s cold, and the service is, if not always attentive, it’s at least efficient.

Our next big food experience happened on a trip into Newark.  Haneen said there was a restaurant in the Portuguese section of the city that she really liked.  She made a great decision:

Sister's restaurant choice in Newark. Good Choice.


Fresh Clams on the Half Shell. A revelation for me.


We each ordered our own entree.  However, we had no idea how huge the plates were.  The food was served on plates that were essentially meant to be passed around family style.  There was enough food on each plate for two people.  We each ate our fair share, though.

My lunch. Grilled Octopus. The boiled vegetables were excellent, too. They actually had flavor.


Steve's choice. Grilled Salmon with Compound Butter. His favorite.


Haneen's Choice. Essentially "Cod Face". It tasted better than it looked. She ordered it because there were chick peas on the side.


On Steve’s last evening in the City, we went to Central Park West & the Upper West Side.  We were meeting a lady of whom I’m a huge fan, comedienne Maysoon Zayid.  We were early, so we wandered around Central Park for a bit.

Central Park West


Springtime in Central Park


No trip to Central Park West is complete without a visit to Strawberry Fields.


We went to Josie’s on Amsterdam & West 74th.  I was told when it first opened in 1994, it was supposedly The Place To Go Restaurant for fresh ingredient foods.  It was good, but nothing was a revelation for me.  In fact, Maysoon had to send back her shrimp because it was bad.  She did like the beet salad they substituted for her.  And she also liked my pasta with pomodoro.

I was so engaged in conversation that I forgot to take pictures of the food.

A photo of us.  The lighting doesn’t do Maysoon justice.  She’s a beautiful woman.

At Josie's with the lovely, beautiful & very funny Maysoon Zayid.


For Steve’s final meal in New York City, we met up with my dear friend, the wonderful Kelly Ann (with whom I’d be bunking for the next week), and headed to Katz’s Deli for lunch. It’s very close to her place in the East Village, so it was a logical choice.

It’s touristy and pricey, but if you enjoy excellent corned beef & pastrami, it’s still the place to go.

Reuben and Egg Cream. Katz's Deli. Steve's choice. Of course.


And, yes. I ordered the Corned Beef. The best I’ve ever tasted.  And a Chocolate Egg Cream? A must-have.

Quite possibly the greatest corned beef sandwich ever. Corned Beef on Rye with Mustard. Katz's Deli.


After Steve handed me off to Kelly and took the train back to NJ to fly back home, Kelly & I decided to begin our food adventures.  I suggested a place that I’d heard about on Anthony Bourdain’s show.

Big Gay Ice Cream. You just can't go wrong here.


The guys who opened the shop started out in a truck.  They became so popular, they were able to open a brick-and-mortar.

I wish I had gotten a photo of what we had: The Salty Pimp.  A cone with vanilla soft serve, laced with Dulche de Leche, sprinkled with Fleur de Sel, and dipped in chocolate.  We ate it too fast for me to take a picture.

They have custom cones (like the Bea Arthur: vanilla soft serve, Nilla Wafers, Dulch de Leche, and Fleur de Sel), ice cream sandwiches, and a make-your own selection.

I saw two gentlemen standing outside near us eating the sandwiches.  I asked how they were.  They said great and offered Kelly & I a bite.  After some initial hesitation, I took him up on his offer.  It was red velvet cookies with the soft serve.  Wow.

After a lovely conversation about ice cream, food, and the South, we parted company.  Amazing how ice cream brings people together.

Needless to say, Kelly & I went back to BGIC 2 more times.  Hey, it’s in her neighborhood. And it’s always good to shop at local businesses.


The next day, Thursday, was a long day.  Kelly & I started at 8am and didn’t finish our day until 1am Friday.  Because it was IACP Tour & Event Day.

Kelly assigned me to help out with the walking tours for the West Village, East Village, and to escort a group to Chef Hiroko Shimbo’s home for a Kaiseki (formal Japanese) Dinner.  Kelly helped me out with the first part of the West Village tour, then she had to leave to take care of her own tours (so, we didn’t meet up again until late in the evening at the end of Hiroko’s dinner).

I was left in the very competent hands of the amazing Liz Young.  She does bus & walking tours in the City (www.lizyoungtors.com).  If you get the opportunity to take a tour with her, do it.  Liz is just wonderful.  And she knows the places to go.  You won’t be disappointed.

The wonderful & amazing Liz Young


We started in the West Village & Greenwich.  Our first stop was Pasticceria Rocco.

Rocco's. On Bleecker St. in the West Village


They’ve been open since 1974 and are apparently world-famous for their cannoli. We were given a small custard pastry and coffee for samples.  While I’m sure they have plenty of wonderful pastries, I wasn’t impressed by what we were given.

But, the counters were pretty.

Rocco's front window.


Lovely little pastries at Rocco's


Rocco's pastry counter #2


Our next stop was Florence Meat Market on Jones Street.  One of the last of the old-school butchers in NYC:

Florence's front window. I just thought it was cool looking.


Old style butcher. A dying breed.


Next was Fiacco Pork Store on Bleecker.  Unfortunately, I didn’t get pictures of the samples – parmesan rice balls.  They were delicious:

Faicco's

By this point in the day, I was already full.


Next was Murray’s Cheese Shop, also on Bleeker. It was gorgeous.

Cheese straws at Murray's. Mmm...


Murray's charcuterie counter


Cheese counter at Murray's


Next came Raffetto’s.  It’s been around since 1906.  Once you try their fresh pasta, you’ll know why.  It was so good, it literally brought tears to my eyes.

The wonderful Andrew and his great mom Ramona. And Liz.


The amazing Ramona with fresh cut pasta. The machine behind her is 90 years old.


Raffetto's grocery shelves


Ramona & Liz.


West Village. Sullivan Street.


Beautiful church across from Joe's Dairy.


After a little hike, we ended up at Joe’s Dairy on Sullivan Street.  The great Vincent came out and acted as guru of mozzarella.

The great Vincent. NYC's Mozzarella Guru.

This mozzarella was literally 5 minutes old.


Brother Michael making the mozzarella. Joe's Dairy.


The final stop on the West Village Tour was Amorino Gelato by NYU.  I didn’t have any because I was already full from everything else.  But it sure looked good.  The people on the tour enjoyed it.

Amorino's flavors.


Very handsome and very Italian store manager. I forgot his name. Shame.


5th Ave. near NYU.


Next, after a 30-minute rest, Liz & I headed out for the East Village walking tour.

East Village.


East Village. Looking down Second Ave.


We started at Veselka, an Eastern European restaurant on Second Street.  It was opened in 1954 by Ukrainian immigrant Wolodymyr Darmochwal.  His daughter and son-in-law still run the restaurant.


Veselka.


Perogies. The house specialty. Potato and Cabbage & Pork. This was a sample plate. Even after working off the previous tour's food, these filled me up.


Our next stop was Pomme Frites on 2nd Ave.  It’s one of my friend Kelly Ann’s favorite places to go.  One of these days I’ll have to try their poutine.

Pomme Frites on 2nd. Ave. East Village


Pomme Frites up close. Decadent.


Off we then wandered to the underground wonderland that’s Jimmy’s No. 43.  You literally go down a flight of stairs on E. 7th into a cozy spot where you can get some wonderful craft beers, locally made sausages with fabulous mustards, and your amiable host, Jimmy Carbone.

Jimmy Carbone. Hugs all the men and kisses all the ladies.


The entrance to Jimmy's lair.


Mmm... Beer


Can't go wrong with sausage and mustard with beer.


One street over on St. Marks (essentially 8th Street), on the edge of Alphabet City, was Dumpling Man. Hand made dumplings.

Dumpling Man!


We got a live demonstration from their head dumpling master.  He was amazing to watch.  Flying fingers, this guy had:

Makin' the dumplings.


Dumplings frying. Pork, Shrimp, Veggie.


Veggie Soup Dumplings


Their own creation, Pumpkin Spice Dumplings. They smelled great and the crowd loved 'em.


The dumplings there were so good, Kelly Ann & I ordered them for dinner three nights later.  Great dipping sauces, too, by the way.


A little impromptu public art.


At this point, I left the tour.  I had to go back to Kelly’s apartment to get ready for the event I’d been looking forward to all day. A Kaiseki Dinner at Hiroko Shimbo’s.

I had to escort a group of 13 to the dinner at Hiroko’s in the West Village.  In the end, 3 went ahead of time and 4 took a cab, so I escorted the other 6 on the F Train to 16th Street.  We arrived to a beautiful table, Hiroko playing hostess, and some awesome smells coming from the kitchen.

Table at Hiroko's.


Ikebana. I think these were plum blossoms.


Individual place setting. Hiroko's.


A place setting menu. Normally, a Kaiseki dinner can be up to 15 - 20 courses. Hiroko played it sane and kept it to 7 courses.


Hiroko was short an assistant that night.  I was recruited to help.  So, for me anyway, I got the best of both worlds.  I still got to sit and enjoy a wonderful dinner as well as help Hiroko and her lovely assistant, Anna, in the kitchen.


Anna (r) and Hiroko in the kitchen prepping the Sushi and Sashimi


Hiroko in her kitchen. I want her kitchen.


Now, for the food.  It was amazing.  And, for me anyway, it was a revelation to have a Japanese dinner without tempura, yakatori, minimal sushi, and no beer.


This was an extra appetizer not on the menu. It was eggplant with a miso sauce.


Asparagus Kuzu Tofu. Very distinct asparagus flavor and very creamy. Almost like a custard. And, yes. That's real gold on top.


Clear Soup Broth. Duck Meatball Soup. The greens were almost like a Chinese Spinach. There was also a little crispy duck skin in the broth as an extra flavoring component.


Slapjack Tuna sushi/sashimi


My favorite. Braised Short Ribs. Although I think this was actually brisket. The sauce had a slightly sweet mirin/5-spicy flavor.


Final Course. Rice & Miso Soup. The pickled radish was a last minute addition.


Dessert. Fruit, Shiratama with Creme Anglaise (she made it with green tea).


The sake served: Kamoshibito Kuheiji and Oze no Yukidoke


It was a great reward for a very long day.

Kelly & I went back to the apartment and slept until almost noon the next day.  We deserved it.


A few days later, on a very cold, drizzly day, Kelly & I took a trip to Chinatown. No trip to New York is complete until a walk through there.  Plus, the food markets are a constant source of fascination for me.

We went to a restaurant I had on a list that I sent Kelly before my trip.  (I always send a suggested list ahead of time.  Kelly always has a list.  They get merged into a list that’s always overambitious.)

The restaurant? Excellent Pork Chop. Other than the meal we got for free my last day, this was the least expensive meal of the trip.

They actually made us move to a different table because, as usual, we ordered way too much food.

My favorite thing about the restaurant? The shrine in the corner:

Shrine at Excellent Pork Chop.


And, now, for the meal:


Shrimp Fried Rice.


Stir Fried Pork with Rice Cakes.


Kelly's lunch. Won Ton Soup. Bet you'd never seen it look like this.


Won Tons in Garlic-Chili Sauce.


Their Excellent Pork Chop. It was a broiled chop rubbed with 5-spice.


My lunch. Clear Seafood Broth with Fish Balls. A funny name for something really delicious.


A little Chinatown culture:

Ducks in the window.


A classic storefront in Chinatown.


Again, the markets are endlessly fascinating for me.  The little dried vegetables, seafood, and meats; the preserved eggs, and the freshness of many of the ingredients are always a learning experience.


Live shrimp at Deluxe Food Market in Chinatown.


Live crab. Deluxe Food Market.


Lovely Chinese Bacon. I almost bought some.


Loaves of cooked pork blood.


Whole dry salted duck.


Pig uterus. I'm actually curious as to how this is cooked. Braised, I'm guessing.


If you’ve been to NYC, then you know that Little Italy is not only next to Chinatown, but is essentially being swallowed up by it.  There’s about 8 blocks of classic Little Italy left in Lower Manhattan.  And I may be overestimating the size of the neighborhood.

But, even though the restaurants are almost all touristy – meaning sub-par and overpriced – there are at least still some shops that are clinging to the old ways.

Thank goodness.

Beautiful dried sausages. Alleva Dairy. Little Italy, NYC


Fresh mozzarella. Alleva Dairy.


Proscuitto! Alleva Dairy.


And, of course, the shop windows are rather enticing.  They make you want to eat again even though you’re full of Chinese Lunch.

Can't remember the store. But, their windows were beautiful.


Lovely. Just Lovely.


The next day, Sunday, was our big goal day.  Walking across the Brooklyn Bridge.  Kelly & I have done this before, but, at least for me, it’s still an exciting expedition.

But first, we were meeting  our friends Cathy and Ray at Bottega Falai.  A cute little pastry & sandwich shop in SoHo on Lafayette.

Yummy bomboloni. My breakfast that day was the chocolate filled.


Crepe Cakes at Bottega Falai.


On a wall in SoHo next to a parking lot. The photo doesn't do this art justice.


Walking through Soho


Off the subway and near the Brooklyn Bridge.  Our ultimate goal? Grimaldi’s Pizza.

Touristy? Yeah.  Delicious? Most definitely.

The Gehry Building. The tallest residential building in the world. Or so I'm told.


Off the subway, near City Hall and across from the Bridge.


Not sure of the name of this building, but I love the old-school architecture. Downtown NYC


First arches. Brooklyn Bridge.


Looking into Manhattan from the Bridge


Looking back into Lower Manhattan at the WTC construction.


Manhattan and the East River from the Bridge


Sweet, sweet Brooklyn.


Our first stop in Brooklyn was at a restored carousel Kelly wanted to see.

Jane’s Carousel is a completely restored historic Carousel made in 1922.  It’s a beautiful 3-row carousel near the East River between the Brooklyn & Manhattan Bridges (janescarousel.com)

Jane's Carousel. Brooklyn


Jane's Carousel. Brooklyn


I just thought he was beautiful. Jane's Carousel.


Now, for a little public art:

This artist, every day for 2 years, would use a color to express his mood. Now it's hanging up in Brooklyn across the street from Jacque Torres' Shop. Delicious hot chocolate, by the way.


After a bit more walking around, we finally ended up at our ultimate goal. Grimaldis.

The queue at Grimaldi's.


The story of the queue. Yes, the line was long. It was also cold and damp.  But, when you know you’re going to eat some damn good pizza, you’re willing to put up with a bit of discomfort.

After about 20 minutes in line, a manager from the restaurant started coming out and announcing numbers. Mostly 2.  When Kelly & I were finally the first party of 2 in the queue, we got to go in ahead of most of the rest of the people.  I couldn’t help but feel a little smug.  And, we were grateful to get into a warm room.

We sat at a cozy little 4-top next to a lovely couple from Maryland.

After waiting for our waiter to stop flirting with two blondes at the bar, we finally got to put in our order.

Pizza #1: The Classic Margarhita. We ate half of it before I remembered to take the picture.


Pizza #2: May Favorite. Pepperoni, Sausage, and Mushroom.


By the way, we were really hungry.  We had 4 pieces left.  We took them back to Kelly’s.  Of course.


The next day, Long Island City & Astoria in Queens.  Because, why the hell not?

The Burger Garage in Long Island City, Queens. Delicious. Their shakes are great. I ate too fast to get a food photo.


We went to a place under the El called 5 Pointz.  It’s a group of buildings that have been set aside for graffiti artists.  Some of their art is amazing.  It’s a wonder what can be done with spray paint and some talent.

An interesting take on Alice in Wonderland. 5 Pointz, Queens


I really liked this one in particular. It was very different from all the other art.


One of the few where I could actually read what had been written. 5 Pointz.


More art. 5 Pointz.


From Long Island City to Astoria:

For you 30 Rock Fans. Where they do most of their principal filming. On the way to Astoria.


Looking from Queens towards Roosevelt Island and Manhattan


An Egyptian restaurant in Astoria, Queens, Kelly & I wanted to try. Unfortunately, it's closed on Mondays. But, the facade is great.


Back in the East Village later that night, we went to what is considered to be one of the best Thai restaurants in the City, Zabb Elee, on 2nd Avenue.  It was perfect after a very chilly day.


Spicy Noodle Soup with Meatballs, Fishballs, and Noodles. Perfect after a long wet walk around Queens.


Shrimp & Basil Salad. Kelly said it was quite spicy. And delicious.


As our final outing for the evening, we went to Veniero’s on East 11th.  One of the oldest Italian pastry shops in NYC.  Open since 1894.

Veniero's front window.


The pastry counter. Veniero.


Mini Cream Tarts. These were great. I had mine for breakfast.


My final day in New York consisted of an excursion to Chelsea and the Meat Packing Districts.  We went to Chelsea Market since I’ve never been before.  It wasn’t what I expected.

It looked to me like offshoots of the restaurants in the area with a few gift shops thrown in for good measure.   I wasn’t impressed.  So, I didn’t feel the need to take any photos.

Kelly & I went to Pastis for a quick bite.  A French Bistro that opened in the Meat Packing District in 1999.  It’s a fairly large space that they claimed was half reserved for the evening and they weren’t setting anyone in that space.  So, they were crowding everyone into the area around the bar.  Then, of course, I saw them seating people in the roped off section.  Either evening came early or we weren’t pretty enough to sit there.

Snark aside, when we finally did get our food (our waiter forgot to turn in our order), it was quite good.  But then, it’s hard to mess up a ham & cheese croissant.  And, Kelly missed out on her poached eggs.  They ran out.

The artifically antiqued mirror at Pastis.


But, we did get our brunch for free.  I’d like to give them another shot on another trip. Maybe lunch.


We then went, for my last excursion, to the Highline.  It’s an old elevated railway that was converted into an elevated walkway and park.  A wonderful example of urban renewal.

On the Highline.


Public Art at the Highline.


Spring colors on the Highline.


Looking into Chelsea from the Highline.


The Highline.


The Empire State Building peeking over Chelsea.


Bird feeders at the Highline.


Final NYC photo. The East River.


After a rather convoluted trip home that consisted of getting stuck in traffic and missing my flight from JFK, getting rerouted, having to spend the night at my parents, and getting home 14 hours later than I originally planned, I made it home to Austin.

First meal home in Austin. Arandas #3. Chicken Flautas and Beef Enchiladas.


As much as I enjoyed my trip, I was very happy to be home.  But, if someone offered me a ticket to go back tomorrow, I’d take it.


I’ll have more pictures posted soon on my photo page.


Points East 0

Posted on March 20, 2012 by Sahar

For the next 2 weeks, I’ll be posting photos and thoughts on my trip to New Jersey & New York City.

I’ll be hitting some new restaurants, helping out with culinary walking tours, eating some wonderful home-cooked meals, and attending the opening gala of the International Association of Culinary Professionals (IACP) conference.

Most photos will be food-related, no doubt.  But, I’ll try to add a little of the local scenery and color in as well.


A few photos from my last (and way too long ago) visit:

Union Square Farmer's Market. 9/2010


Diner. Williamsburg, Brooklyn. Amazing burgers. 9/2010


From the Cool Old Ruins Dept. Brooklyn. 9/2010


Touristy, I know. But, damn, their corned beef & matzo ball soup are excellent. 9/2010


Some of the best fried chicken I have ever eaten. Harlem. 9/2010


Soup dumplings. 'Nuff said. Flushing, Queens. 9/2010


Fruit & Medicine Garden. The Cloisters. Washington Heights, Manhattan. 9/2010


Boardwalk. Asbury Park, NJ 9/2010


See you all on the East Side!


↑ Top